Preamble
The intent of this document is to provide a complete, step-by-step guide on how to setup a virtual machine(VM) with graphics cards(GPU) passthrough – detailed enough that even Linux rookies are able to participate.
The final system will run Xubuntu 16.04 as host operating system(OS), and Windows 10 as guest OS, considering gaming as main use-case of the guest.
When I switched from Windows to Linux, for me Xubuntu was the easiest Linux distribution(distro) to familiarize with. I have tried others, but somehow sticked with it in the end (beeing quiet happy). 🙂
I want to emphasize that (X)Ubuntu (or any Debian based distro) is not the easiest distro to do virtual machine passthrough.
Most of the guides I found online were targeting either Fedora or Arch as the host operating system.
Especially Fedora 26 should be easy to setup for passthrough (as recommended by level1techs).
About the guide
Attention: A new version of this guide, for Ubuntu 18.04 is available.
Setting up a virtual machine with direct hardware passthrough allows the the VM to retrieve close to bare metal performance, from said hardware.
Unfortunately, the setup process can be pretty complex.
It consists of fixed base settings, some variable settings and several optional (mostly performance) settings.
In order to sustain readability of this post, and because I aim to use the virtual machine for gaming only, I minimized the variable parts for latency optimization.
The variable topics itself are linked in articles – I hope this makes sense. 🙂
Requirements
Hardware
In order to successfully follow this guide, it is mandatory that the used hardware supports virtualization and IOMMU groups.
When composing the systems hardware, I was eager to avoid the necessity of kernel patching.
The ACS patch is not required for the given combination of processor and mainboard.
The Nested Page Tables(NPT)-bug has been fixed in Kernel version >4.15rc1 (Dec. 2017).
The setup used for this guide is:
- Ryzen7 1800x
- Asus Prime-x370 pro
- 32GB RAM DDR4-3200 running at 2800MHz
(2x 16GB G.Skill RipJaws V black, CL16 Dual Kit) - Nvidia Geforce 730 GT (Host GPU-PCIe slot1)
- Nvidia Geforce 970 GTX (Guest GPU-PCIe slot2)
- Enermax Revolution X’t II 550W
- 220GB SSD for host system
- 120GB SSD for guest image
BIOS settings
Make sure your BIOS is up to date.
I used Version: 3402 (11th Dec 2017)
Enable the following flags in the bios menu:
- Advanced \ CPU config – SVM Module -> enable
- Advanced \ AMD CBS – IOMMU -> enable
Operating System
I installed Xubuntu 16.04 x64 (UEFI) from here.
As I am writing this guide, the NPT-bug for Ryzen systems has been recently fixed. Out of laziness, I used the 4.15.rc7 kernel, installed via ukuu, in order to avoid patching my kernel by hand.
Once 4.15 is released, any Kernel >= 4.15 should work. Also I had to use the latest Nvidia driver (390.12) in order to have proper graphics support on the host, while running kernel 4.15rc7.
So before continuing make sure your:
- used kernel is at least 4.15rc7 (check via
uname -r) - used Nvidia driver is at least 390.12 (you can check via “additional drivers” and install e.g. like this)
Setting up the passthrough
Let me make the following simplifications, in order to fulfill my claim of beginner friendliness for this guide:
Devices connected to the mainboard, are members of (IOMMU) groups – depending on where and how they are connected. It is possible to pass devices into a virtual machine. Passed through devices have nearly bare metal performance when used inside the VM.
On the downside, passed through devices are isolated and thus no longer available to the host system. Furthermore it is only possible to isolate all devices of one IOMMU group at the same time. This means, even when not used in the VM if a devices is IOMMU-group sibling of a passed through device, it can not be used on the host system.
Enabling IOMMU feature
Modify the grub config:
open sudo nano /etc/default/grub
and edit it to match:GRUB_CMDLINE_LINUX_DEFAULT="amd_iommu=on iommu=pt kvm_amd.npt=1"
afterwards use:sudo update-grub
and reboot your system.
Afterwards one can verify if iommu is enabled:
dmesg |grep AMD-Vi
see next box… this one is broken 🙁
[ 0.792691] AMD-Vi: IOMMU performance counters supported [ 0.794428] AMD-Vi: Found IOMMU at 0000:00:00.2 cap 0x40 [ 0.794429] AMD-Vi: Extended features (0xf77ef22294ada): [ 0.794434] AMD-Vi: Interrupt remapping enabled [ 0.794436] AMD-Vi: virtual APIC enabled [ 0.794688] AMD-Vi: Lazy IO/TLB flushing enabled
Identification of the guest GPU
Attention:After following the upcoming steps, the guest GPU will be ignored by the host OS. You have to use a second GPU for the host OS.
In order to activate the hardware passthrough for virtual machines, we have to make sure the nvidia driver is not taking ownership of the PCIe devices; isolate it before we can hand it over.
This is done by applying the vfio-pci to the guest GPU, during the system startup.
Depending on the PCIe slot installed, the hardware has different IOMMU group affilation. One can use a bash script like this in order to determine devices and their grouping:
#!/bin/bash
shopt -s nullglobfor d in /sys/kernel/iommu_groups/*/devices/*; do
n=${d#*/iommu_groups/*}; n=${n%%/*}
printf 'IOMMU Group %s ' "$n"
lspci -nns "${d##*/}"
done;
source: wiki.archlinux.org
…
see next box… this one is broken 🙁
IOMMU Group 0 00:01.0 Host bridge [0600]: Advanced Micro Devices, Inc. [AMD] Device [1022:1452] IOMMU Group 10 00:08.1 PCI bridge [0604]: Advanced Micro Devices, Inc. [AMD] Device [1022:1454] IOMMU Group 11 00:14.0 SMBus [0c05]: Advanced Micro Devices, Inc. [AMD] FCH SMBus Controller [1022:790b] (rev 59) IOMMU Group 11 00:14.3 ISA bridge [0601]: Advanced Micro Devices, Inc. [AMD] FCH LPC Bridge [1022:790e] (rev 51) IOMMU Group 12 00:18.0 Host bridge [0600]: Advanced Micro Devices, Inc. [AMD] Device [1022:1460] IOMMU Group 12 00:18.1 Host bridge [0600]: Advanced Micro Devices, Inc. [AMD] Device [1022:1461] IOMMU Group 12 00:18.2 Host bridge [0600]: Advanced Micro Devices, Inc. [AMD] Device [1022:1462] IOMMU Group 12 00:18.3 Host bridge [0600]: Advanced Micro Devices, Inc. [AMD] Device [1022:1463] IOMMU Group 12 00:18.4 Host bridge [0600]: Advanced Micro Devices, Inc. [AMD] Device [1022:1464] IOMMU Group 12 00:18.5 Host bridge [0600]: Advanced Micro Devices, Inc. [AMD] Device [1022:1465] IOMMU Group 12 00:18.6 Host bridge [0600]: Advanced Micro Devices, Inc. [AMD] Device [1022:1466] IOMMU Group 12 00:18.7 Host bridge [0600]: Advanced Micro Devices, Inc. [AMD] Device [1022:1467] IOMMU Group 13 01:00.0 USB controller [0c03]: Advanced Micro Devices, Inc. [AMD] Device [1022:43b9] (rev 02) IOMMU Group 13 01:00.1 SATA controller [0106]: Advanced Micro Devices, Inc. [AMD] Device [1022:43b5] (rev 02) IOMMU Group 13 01:00.2 PCI bridge [0604]: Advanced Micro Devices, Inc. [AMD] Device [1022:43b0] (rev 02) IOMMU Group 13 02:00.0 PCI bridge [0604]: Advanced Micro Devices, Inc. [AMD] Device [1022:43b4] (rev 02) IOMMU Group 13 02:02.0 PCI bridge [0604]: Advanced Micro Devices, Inc. [AMD] Device [1022:43b4] (rev 02) IOMMU Group 13 02:03.0 PCI bridge [0604]: Advanced Micro Devices, Inc. [AMD] Device [1022:43b4] (rev 02) IOMMU Group 13 02:04.0 PCI bridge [0604]: Advanced Micro Devices, Inc. [AMD] Device [1022:43b4] (rev 02) IOMMU Group 13 02:06.0 PCI bridge [0604]: Advanced Micro Devices, Inc. [AMD] Device [1022:43b4] (rev 02) IOMMU Group 13 02:07.0 PCI bridge [0604]: Advanced Micro Devices, Inc. [AMD] Device [1022:43b4] (rev 02) IOMMU Group 13 06:00.0 USB controller [0c03]: ASMedia Technology Inc. Device [1b21:1343] IOMMU Group 13 07:00.0 Ethernet controller [0200]: Intel Corporation I211 Gigabit Network Connection [8086:1539] (rev 03) IOMMU Group 14 09:00.0 VGA compatible controller [0300]: NVIDIA Corporation GK208 [GeForce GT 730] [10de:1287] (rev a1) IOMMU Group 14 09:00.1 Audio device [0403]: NVIDIA Corporation GK208 HDMI/DP Audio Controller [10de:0e0f] (rev a1) IOMMU Group 15 0a:00.0 VGA compatible controller [0300]: NVIDIA Corporation GM204 [GeForce GTX 970] [10de:13c2] (rev a1) IOMMU Group 15 0a:00.1 Audio device [0403]: NVIDIA Corporation GM204 High Definition Audio Controller [10de:0fbb] (rev a1) IOMMU Group 16 0b:00.0 Non-Essential Instrumentation [1300]: Advanced Micro Devices, Inc. [AMD] Device [1022:145a] IOMMU Group 17 0b:00.2 Encryption controller [1080]: Advanced Micro Devices, Inc. [AMD] Device [1022:1456] IOMMU Group 18 0b:00.3 USB controller [0c03]: Advanced Micro Devices, Inc. [AMD] Device [1022:145c] IOMMU Group 19 0c:00.0 Non-Essential Instrumentation [1300]: Advanced Micro Devices, Inc. [AMD] Device [1022:1455] IOMMU Group 1 00:01.3 PCI bridge [0604]: Advanced Micro Devices, Inc. [AMD] Device [1022:1453] IOMMU Group 20 0c:00.2 SATA controller [0106]: Advanced Micro Devices, Inc. [AMD] FCH SATA Controller [AHCI mode] [1022:7901] (rev 51) IOMMU Group 21 0c:00.3 Audio device [0403]: Advanced Micro Devices, Inc. [AMD] Device [1022:1457] IOMMU Group 2 00:02.0 Host bridge [0600]: Advanced Micro Devices, Inc. [AMD] Device [1022:1452] IOMMU Group 3 00:03.0 Host bridge [0600]: Advanced Micro Devices, Inc. [AMD] Device [1022:1452] IOMMU Group 4 00:03.1 PCI bridge [0604]: Advanced Micro Devices, Inc. [AMD] Device [1022:1453] IOMMU Group 5 00:03.2 PCI bridge [0604]: Advanced Micro Devices, Inc. [AMD] Device [1022:1453] IOMMU Group 6 00:04.0 Host bridge [0600]: Advanced Micro Devices, Inc. [AMD] Device [1022:1452] IOMMU Group 7 00:07.0 Host bridge [0600]: Advanced Micro Devices, Inc. [AMD] Device [1022:1452] IOMMU Group 8 00:07.1 PCI bridge [0604]: Advanced Micro Devices, Inc. [AMD] Device [1022:1454] IOMMU Group 9 00:08.0 Host bridge [0600]: Advanced Micro Devices, Inc. [AMD] Device [1022:1452]
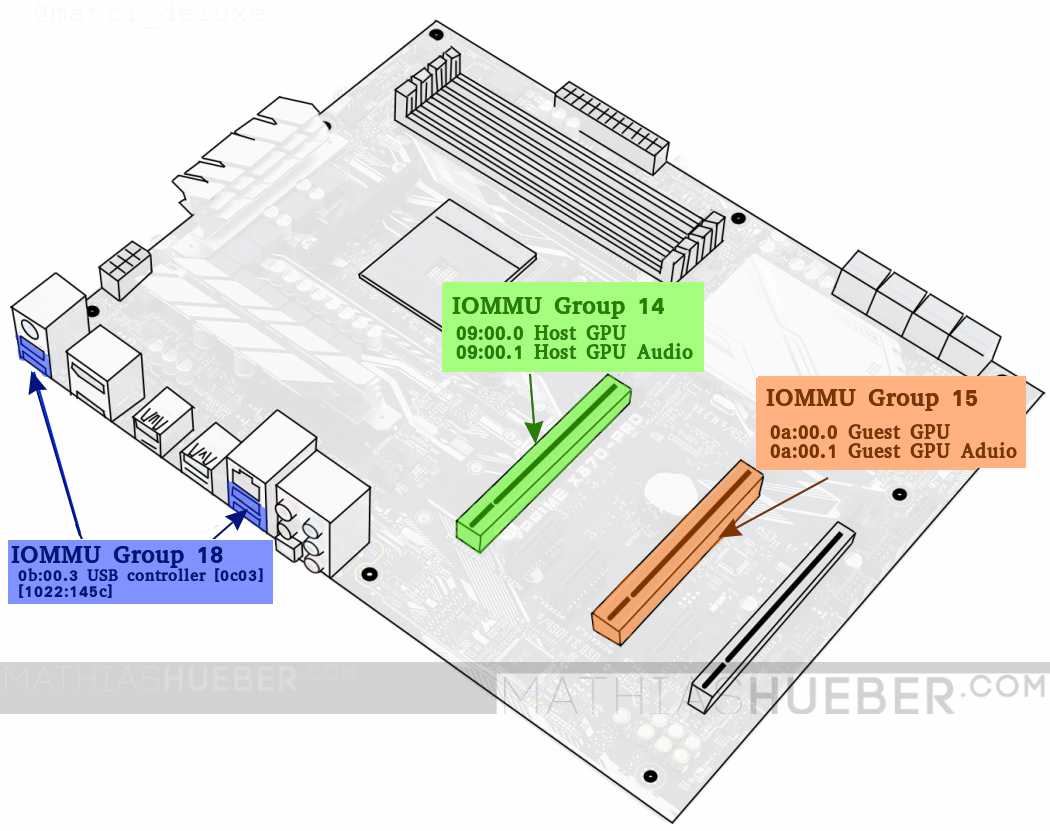
We are looking for the device id of the guest GPU and a suitable USB controller for isolation. Keep in mind that the GPU usually comes combined with an audio device.
We will isolate the GPU in PCIe slot 2, and the USB-controller from group 18 see figure 1.
Ubuntu 16.04 and Windows 10 1")
IOMMUGroup 150a:00.0VGA compatible controller [0300]: NVIDIA Corporation GM204 [GeForce GTX 970][10de:13c2](rev a1)IOMMUGroup 150a:00.1Audio device [0403]: NVIDIA Corporation GM204 High Definition Audio Controller[10de:0fbb](rev a1)IOMMUGroup 180b:00.3USB controller [0c03]: Advanced Micro Devices, Inc. [AMD] Device[1022:145c]
For the next step only the GPU-Id is needed.
We have to isolate 10de:13c2 and 10de:0fbb. The USB-controller Id (1022:145c) is later used.
Isolation of the guest GPU
In order to isolate the gfx card modify /etc/initramfs-tools/modules via:
sudo nano /etc/initramfs-tools/modules
and add:
vfiovfio_iommu_type1vfio_virqfdvfio_pci ids=10de:13c2,10de:0fbb
modify /etc/modules aswell via:sudo nano /etc/modules
and add:
vfiovfio_iommu_type1vfio_pci ids=10de:13c2,10de:0fbb
These changes will pass device-ids to the vfio_pci module, in order to reserve these devices for the passthrough. It is crucial that the vfio_pci module claims the GPU before the actual driver (in this case the nvidia graphic-cards driver) loads, otherwise it is not possible to isolate the GPU. In order to alter the load sequence in favour to vfio_pci before the nvidia driver, create a file in the modprobe.d folder via sudo nano /etc/modprobe.d/nvidia.conf
and add the the following line:
softdep nvidia_390 pre: vfio-pcisave and close the file.
In case you are not using the Nvidia 390 driver the nvidia_390 should be changed regarding your system. You can determine the proper name via lspci -nnv find the guest GPU and lookup the line “Kernel modules:” this is the ouput on my machine:
0a:00.0 VGA compatible controller [0300]: NVIDIA Corporation GM204 [GeForce GTX 970] [10de:13c2] (rev a1) (prog-if 00 [VGA controller])
 Subsystem: CardExpert Technology GM204 [GeForce GTX 970] [10b0:13c2]
 Flags: fast devsel, IRQ 15
 Memory at f4000000 (32-bit, non-prefetchable) [disabled] [size=16M]
 Memory at d0000000 (64-bit, prefetchable) [disabled] [size=256M]
 Memory at e0000000 (64-bit, prefetchable) [disabled] [size=32M]
 I/O ports at c000 [disabled] [size=128]
 Expansion ROM at f5000000 [disabled] [size=512K]
 Capabilities: <access denied>
 Kernel driver in use: vfio-pci
 Kernel modules: nvidiafb, nouveau, nvidia_390, nvidia_390_drm
Create another file via sudo nano /etc/modprobe.d/vfio.conf
to add the the following line:
options vfio-pci ids=10de:13c2,10de:0fbbObviously, the ids have to be the same we have added before to the modules file. Now save and close the file.
when all is done run:sudo update-initramfs -u -k all
Attention: After the following reboot the isolated GPU will be ignored by the host OS. You have to use the other GPU for the host OS NOW!
-> reboot the system.
Verify the isolation
In order to verify a proper isolation of the device, run:
lspci -nnv
find the line "Kernel driver in use" for the GPU and its audio part. It should state vfio-pci.
0a:00.0 VGA compatible controller [0300]: NVIDIA Corporation GM204 [GeForce GTX 970] [10de:13c2] (rev a1) (prog-if 00 [VGA controller]) Subsystem: CardExpert Technology GM204 [GeForce GTX 970] [10b0:13c2] Flags: bus master, fast devsel, latency 0, IRQ 44 Memory at f4000000 (32-bit, non-prefetchable) [size=16M] Memory at d0000000 (64-bit, prefetchable) [size=256M] Memory at e0000000 (64-bit, prefetchable) [size=32M] I/O ports at c000 [size=128] Expansion ROM at f5000000 [disabled] [size=512K] Capabilities: <access denied> Kernel driver in use: vfio-pci Kernel modules: nvidiafb, nouveau
Congratulations, the hardest part is done! 🙂
The virtual machine
Before we start, install the virtualization manager and related software via:
sudo apt-get install qemu-kvm libvirt-bin bridge-utils virt-manager ovmf
The virtualization is done via an open source machine emulator and virtualizer called QEMU. One can either run qemu directly, or use a GUI called virt-manager in order setup, and run a virtual machine. I prefer using the GUI. Unfortunately not every settings is supported in the Virtual Manager. Thus, I define the basic settings in the UI do a quick VM start and force stop it right after I see the GPU is passed-over correctly. Afterwards one can edit the missing bits into the VM config via virsh.
Make sure you have your windows iso file, as well as the virtio windows drivers downloaded and ready for the instalation.
Preconfiguration steps
As I said, lots of variable parts can add complexity to a passthrough guide. Before we can continue we have to make a decision about the storage type of the virtual machine.
Creating image container
In this guide I use a raw image container, see the storage post for further information.
fallocate -l 111G /media/vm/win10.img
The 111G were set in order to maximize the size of the image file and still fit on the 120GB SSD.
Creating an Ethernet Bridge
We will use a bridged connection for the virtual machine. This requires a wired connection to the computer.
I simply followed the great guide from heiko here.
see the ethernet setups post for further information.
Create a new virtual machine
As said before we use the virtual machine manager GUI to create the virtual machine with basic settings.
In order to do so start up the manager and click the “Create a new virtual machine” button.
Step 1
Select “Local install media” and proceed forward (see figure 2).
Ubuntu 16.04 and Windows 10 2")
Step2
Now we have to select the windows iso file we want to use for the installation (see figure3). Also check the automatic system detection.
Hint:Use the button “browse local” (one of the buttons on the right side) to browse to the iso location.
Ubuntu 16.04 and Windows 10 3")
Step 3
Put in the amount of RAM and CPU cores you want to passthrough and continue with the wizard. I want to use 12 Cores (16 is maximum) and 16384 MiB of RAM in my VM.
Ubuntu 16.04 and Windows 10 4")
Step 4
Here we have to choose our previously created storage file and continue.
Ubuntu 16.04 and Windows 10 5")
Step 5
On the last steps are slightly more clicks required.
Put in a meaningful name for the virtual machine. This becomes the name of the xml config file, I guess I would not use anything with spaces in it. It might work without a problem, but I wasn’t brave enough to do so in the past.
Furthermore make sure you check “Customize configuration before install”.
For the “network selection” pick “Specify shared device name” and type in the name of the network bridge we had created previously. You can use ifconfig in a terminal to show your ethernet devices. In my case that is “bridge0”.
Ubuntu 16.04 and Windows 10 6")
First configuration
Once you have pressed “finish” the virtual machine configuration window opens. The left column displays all hardware devices which this VM uses. By left clicking on them, you see the options for the device on the right side. You can remove hardware via right click. You can add more hardware via the button below. Make sure to hit apply after every change.
The following screenshots may vary slightly from your GUI (as I have added and removed some hardware devices).
Overview
On the Overview entry in the list make sure that for “Firmware” UEFIx86_64 [...] OVMF [...] is selected. “Chipset” should be i440FX see figure7.
Ubuntu 16.04 and Windows 10 7")
CPUs
For the “Model:” click in to the drop-down, as if it is a text field, and type in host-passthrough.
For “Topology” check “Manually set CPU topology” with the following values:
- Sockets: 1
- Cores: 6
- Threads: 2
Ubuntu 16.04 and Windows 10 8")
Disk 1
When you first enter this section it will say “IDE Disk 1”. We have to change the “Disk bus:” value to VirtIO.
Ubuntu 16.04 and Windows 10 9")
VirtIO Driver
Next we have to add the virtIO driver iso, so it be used during the windows installation. Otherwise the installer can not recognize the storage volume we have just changed from ide to virtio.
In order to add the driver press “Add Hardware”, select “Storage” select the downloaded image file.
For “Device type:” select CDROM device. For “Bus type:” select IDE otherwise windows will also not find the CDROM either 😛 (see Figure10).
Ubuntu 16.04 and Windows 10 10")
PCI Devices
Now we have to add our guest GPU and the usb controller we want to passthrough. Click “Add Hardware” select “PCI Host Device” and find the device by its ID. Do this three times:
- 0000:0a:00.0 for Geforce GTX 970
- 0000:0a:00.1 for Geforce GTX 970 Audio
- 0000:0b:00.3 for the USB controller
Ubuntu 16.04 and Windows 10 11")
Remark: In case you later add further hardware (e.g. another PCIe device), these IDs might/will change – just keep in mind if you change the hardware just redo this step with updated Ids (see Update 2).
This should be it. Plugin a second mouse and keyboard in the USB ports of the passed through controller (see figure1).
Hit “Beginn installation”, a Tiano core logo should appear on the monitor connected to the GTX 970. If a funny white and yellow shell pops-up you can use exitto leave it.
When nothing happens, make sure you have both CDROM device (one for each iso windows10 and virtIO driver) in your list. Also check the “boot options” entry.
Once you see the windows installation, use force off from the virtual machine manager to stop the VM.
Final configuration and optional steps
In order edit the virtual machine
cd /etc/libvirt/qemu sudo virsh define windows10.xml (change this according to your virtual machine name)sudo virsh edit windows10
once your done with the edits and have saved your config re-run
sudo virsh define windows10.xml
I have added the following changes to my configuration:
Ryzen CPU optimizations
I rewrote this section in a separate article – see here.
Hugepages for better RAM performance
This step is optionaland requires previous setup: See the Hugepages post for details.
find the line which ends with </currentMemory> and add the following block behind it:
<memoryBacking><hugepages/></memoryBacking>
Attention:Make sure <memoryBacking> and <currentMemory> have the same indent.
Removing Error 43 for Nvidia cards
This guide uses an Nvidia card as guest GPU. Unfortunately, the Nvidia driver throws Error 43 , if it recognizes the GPU is being passed through to a virtual machine.
I rewrote this section and moved it into a separate article.
Getting audio to work
After some sleepless nights I wrote an separate article on that matter.
to be continued…
Updates
Update 1 – 13.01.2018
With release of kernel 4.15rc7 and Nvidia driver 390.12 the host nvidia graphics have been fixed.
Reddit user atomiczap pointed out that when the nvidia driver is properly working on the host, the system is unable to assign the vfio_pci driver to the guest GPU before the nvidia driver can grab it.
Thank you for that! 🙂 I updated the “Setting up the passthrough” chapter in order to tackle the problem.
Update 2 – 08.02.2018
After a few weeks of usage, I realized that I had issues with the sound quality of the on-board microphone on the Asus Prime-x370 pro. It was a constant static noise during the transmission. So I decided to get an extra PCIe sound-card. I bought the Asus Xonar 5.1, as it is supported by Ubuntu out of the box.
Well, close to out of the box 🙂 – I had to run alsamixer choose the “Xonar DGX” (via F6) and change the “Analog Out” channel from “Headphone” to “Multichannel” (via up/down) in order to hear sound from the speakers.
Unfortunately, since I added the sound card, the virtual machine refused to start. After a while I realized that the PCI-IDs of the devices in IOMMU group 15 (my guest GPU) and group 18 (my guest USB controller) changed, since I added the additional PCIe card.
PCI-IDs before the sound card was added:
- 0000:0a:00.0 for Geforce GTX 970
- 0000:0a:00.1 for Geforce GTX 970 Audio
- 0000:0b:00.3 for the USB controller
Changed PCI-IDs after I added the sound card:
- 0000:0b:00.0 for Geforce GTX 970
- 0000:0b:00.1 for Geforce GTX 970 Audio
- 0000:0c:00.3 for the USB controller
Basically I had to remove all PCIe devices via the Virtual Machine Manager, and re-add the devices with corrected PCI-Ids.
I also had to upgrade the PSU from 550W without the sound card to a new 750W version.
Update 3 – 18.08.2018
Reworked the Document structure of the post.
Also I updated to Xubuntu 18.04 and the passthorugh still works. I had to add further lines to the /etc/modprobe.d/nvidia.conf file in order to work with the newer Nvidia driver, which shipos with 18.04. Make sure that the file contains at least the following lines:
softdep nouveau pre: vfio-pci

softdep nvidia_390 pre: vfio-pci

softdep nvidia pre: vfio-pci

softdep nvidia-* pre: vfio-pci

softdep nvidia_* pre: vfio-pci
Not all wildcards are required I guess, but it works and I am to lazy to clean it up.
Also remember to run sudo update-initramfs -u -k all after the change.
Update 4 – 08.02.2019
I have created a new version of this guide, targeting 18.04
Sources
The glorious Arch wiki
heiko-sieger.info: Really comprehensive guide
Great post by user “MichealS” on level1techs.com forum
Wendels draft post on Level1techs.com
Jorge
This was very helpful. Thank you from Argentina.
Mathias Hueber
Glad it helps 🙂
Gianluca
Hello!
Thank you a lot for your guide!
I would to know if this kind of configuration can be unstable on “medium” period or it is rock solid once the problems are solved.
Have you had problems with updates later?
Thank you again!
Best regards,
Gianluca
Mathias Hueber
Hello Gianluca,
I had some problems when I played around with the RAM timings. With the May 2018 BIOS I was able to boot the PC with 2933Mhz RAM speed, but had a lot of blue screens (funny enough only in the windows VM). I settled for a conservative 2600 now. No more blue screens since then. All other Problems are solved with Kernel > 4.15.
Heiko
Hello Mathias,
Thanks for the tutorial! Have to try it out when I find some time. Hope you don’t mind if I link to it – I suppose many users will prefer using virtual machine manager, although to me it always seems incomplete.
Have you measured performance before and after the CPU pinning and iothreads? In my X79 / Intel i7 3930K system I get the best performance by just specifying all cores and threads (6 cores, 2 threads per core). Thanks again for your efforts!
Heiko
Mathias Hueber
Hello Heiko,
I have “played around” with the iothreads and pinning options. Nothing scientific, I just sticked with the options that felt “most smooth”.
Glad you like the guide, feel free to link it.
VicHaunter
Hello, thanks for the guide, it clarify a lot. I want to ask you if you tried to make it run with proxmox virtualization that is using lxc. I want to move my workstation to kvm+vz and i didn’t found any useful information, only your guide but you use virsh. My idea is to set 2vms with windows and it’s own cards each one (for university work in one user and gaming in another kvm diferent user, 2 persons simultaneously), and let the main operating system only with proxmox web management due is not needed gui (i know you need at least one gpu but i think could be used the mb one?).
Can you give me a hand? due my computer is next to die i’m thinking to do it soon, maybe we can compose another guide for this use case.
Thankyou in advance
Mathias Hueber
Hello,
glad the guide is useful. Unfortunately, I have no experience with proxmox and currently no system to tinker around with. But I don’t think that running the host without a gpu is a problem.
Have you checked reddit.com/r/vfio – lots of helpful people over there.
Ishwor Gurung
I will be soon setting up few kvm/qemu on a similar setup on R7 2700s / Asrock B450m but this time I will be using Ubuntu instead of Fedora. I won’t need passthrough but nonetheless this post will be handy to refer to.
I have installed many non-passthrough based kvm/qemu hosts on Fedora 2x and I agree that it is relatively straight-forward on a Fedora.
Thanks; Will check back soon.
Jo
You should not use a newer BIOS than 4207 (8th Dec 2018)!
(I tried to in April 2019)
After upgrading to the newest version, passing-through didn’t work anymore with the separated x16-slots (unknown PCIe header message in VMs).
Downgrading back to 4207 was a pain cuz downgrading seems not to be supported by Asus-Tools (but it is possible).
Mathias Hueber
Ohh okay… I will add the remark thank you for the input.
snowie
Where is the virt0 iso link?