Preamble
How to make PCI passthrough work in virtual machines on Ubuntu 22.04 LTS based distributions.
When we are done, your system will run (X)ubuntu 22.04 as host operating system (OS), and a virtual machine with Windows 11 as guest OS. The clue is, that the guest will have direct and exclusive access to certain hardware components. This makes, for example gaming, or other heavy lifting inside a virtual machine possible.
As it is tradition, I try limit changes of the host operating system to a minimum, but provide enough details, that even Linux rookies are able to participate.
As the complete setup process can become pretty complex. This guide consists of several parts:
- fixed base settings:
- Hardware identification for passthrough
- Hardware (GPU) isolation
- Virtual machine installation
- some variable settings
- Virtual machine setup
- several optional settings
- Performance tweaks
- Troubleshooting
In order to sustain readability of this post, and because I aim to use the virtual machine for gaming only, I minimized the variable parts to latency optimization. The variable topics itself are linked in articles – I hope this makes sense. 🙂
About this guide
This guide targets Ubuntu 22.04 and is based on my former guides for Ubuntu 20.04, 18.04 and 16.04 host systems (wow, time flies).
However, this guide should be also applicable to Pop!_OS 22.04 and newer. If you wish to proceed with Pop!_OS as host system you can do so, just look out for my colorful Pop!_OS labels.
Breaking changes for older passthrough setups in Ubuntu 22.04
Kernel version
Ubuntu 22.04 ships with 5.15 (use uname -r to check)
Starting with kernel version 5.4, the “vfio-pci” driver is no longer a kernel module, but build-in into the kernel. Thus, we use a different way, instead of using initramfs-tools/modules config files, as it was common in older guides, such as the 18.04 guide.
QEMU version
Ubuntu 22.04 ships with QEMU version 6.2.0 (use qemu-system-x86_64 --version to check)
If you want to use a different (newer) version of QEMU, you can build it on your own.
Libvirt version
Ubuntu 22.04 ships with libvirt 8.0.0 (use virsh --version to check)
Attention!
In case you want to use a previously used virtual machine and run into boot loops, check the OVMF_CODE setting for your virtual machine. See the troubleshooting chapter about OVMF updates.
Wayland & Xorg
I run a Nvidia only system, thus Xorg is default. From the Ubuntu release log:
“[…] NVIDIA has requested that we (Ubuntu/Canonical) default to X.Org on NVIDIA-only systems. […]”
https://bugs.launchpad.net/ubuntu/+source/gdm3/+bug/1969566
Boot manager
Ubuntu 22.04 uses Grub 2.06
Each time I ran sudo update-grub, I have received the warning message:
Memtest86+ needs a 16-bit boot, that is not available on EFI, exiting
Warning: os-prober will not be executed to detect other bootable partitions.
Systems on them will not be added to the GRUB boot configuration
Check GRUB_DISABLE_OS_PROBER documentation entry.
Adding boot menu entry for UEFI Firmware Settings
done
From omgwtfubuntu.com:
The OS_prober feature is disabled by default in GRUB 2.06, which is the version included in Ubuntu 22.04. This is an upstream change designed to counter potential security issues with the OS-detecting feature […]
If you are multi-booting with other Linuxes and Windows, you might find a problem, when you update/upgrade Ubuntu (maybe with other Linuxes too) sometime now, it’d stop “seeing” other distros and Windows.
For my setup this was not an issue.
I think, starting with version 19.04, Pop!_OS uses systemd as boot manager, instead of grub. This means triggering kernel commands works differently in Pop!_OS.
Introduction to VFIO, PCI passthrough and IOMMU
Virtual Function I/O (or VFIO) allows a virtual machine (VM) direct access to a Peripheral Component Interconnect PCI hardware bus resources. Such as a graphics processing unit (GPU).
Virtual machines with set up GPU passthrough can gain close to bare metal performance, which makes running games in a Windows virtual machine possible.
Let me make the following simplifications, in order to fulfill my claim of beginner friendliness for this guide:
- PCI devices are organized in so called IOMMU groups.
- In order to pass a device over to the virtual machine, we have to pass all the devices of the same IOMMU group as well.
- In a prefect world each device has its own IOMMU group — unfortunately that’s not the case.
- Passed through devices are isolated
- Thus no longer available to the host system.
- It is only possible to isolate all devices of one IOMMU group at the same time.
This means, even when not used in the VM, a device can no longer be used on the host, when it is an “IOMMU group sibling” of a passed through device.
Is this content any helpful? Then please consider supporting me.
If you appreciate the content I create, this is your chance to give something back and earn some good old karma.
Although ads are fun to play with, and very important for content creators, I felt a strong hypocrisy in putting ads on my website. Even though, I always try to minimize the data collecting part to a minimum.
Thus, please consider supporting this website directly.
Requirements
Hardware
In order to successfully follow this guide, it is mandatory that the used hardware supports virtualization and has properly separated IOMMU groups.
The used hardware
- AMD Ryzen 7 3800XT 8-Core (CPU)
- Asus Prime-x370 pro (Mainboard)
- 2x 16 GB DDR4-3200 running at 2400MHz (RAM)
- Nvidia GeForce 1050 GTX (Host GPU; PCIE slot 1)
- Nvidia GeForce 1060 GTX (Guest GPU; PCIE slot 2)
- 500 GB NVME SSD (Guest OS; M.2 slot)
- 500 GB SSD (Host OS; SATA)
- 750W PSU
- Additional mouse and keyboard for virtual machine setup
When composing the systems’ hardware, I was eager to avoid the necessity of kernel patching. Thus, the ACS override patch is not required for said combination of mainboard and CPU.
If your mainboard has no proper IOMMU separation you can try to solve this by using a patched kernel, or patch the kernel on your own.
BIOS settings
Enable the following flags in your BIOS:
Advanced \ CPU config - SVM Module -> enableAdvanced \ AMD CBS - IOMMU -> enable
Attention!
The ASUS Prime x370/x470/x570 pro BIOS versions for AMD RYZEN 3000-series support (v. 4602 – 5220), will break a PCI passthrough setup.
Error: “Unknown PCI header type ‘127’“.
BIOS version up to (and including) 4406, 2019/03/11 are working.
BIOS version from (and including) 5406, 2019/11/25 are working.
I used Version: 4207 (8th Dec 2018)
Host operating system settings
I have installed Xubuntu 22.04 x64 (UEFI) from here.
Ubuntu 22.04 LTS ships with kernel version 5.15 which works good for VFIO purposes – check via: uname -r
Attention!
Any kernel, starting from version 4.15, works for a Ryzen passthrough setup.
Except kernel versions 5.1, 5.2 and 5.3 including all of their subversion.
Before continuing make sure that your kernel plays nice in a VFIO environment.
Install the required software
Install QEMU, Libvirt, the virtualization manager and related software via:
sudo apt install qemu-kvm qemu-utils libvirt-daemon-system libvirt-clients bridge-utils virt-manager ovmf
Setting up the PCI passthrough
We are going to passthrough the following devices to the VM:
- 1x GPU: Nvidia GeForce 1060 GTX
- 1x USB host controller
- 1x SSD: 500 GB NVME M.2
Enabling IOMMU feature
Enable the IOMMU feature via your grub config. On a system with AMD Ryzen CPU run:
sudo nano /etc/default/grub
Edit the line which starts with GRUB_CMDLINE_LINUX_DEFAULT to match:
GRUB_CMDLINE_LINUX_DEFAULT="amd_iommu=on iommu=pt" you can leave quiet splash as well, if you like it.
In case you are using an Intel CPU the line should read:
GRUB_CMDLINE_LINUX_DEFAULT="intel_iommu=on"
Once you’re done editing, save the changes and exit the editor (CTRL+x CTRL+y).
Afterwards run:
sudo update-grub
→ Reboot the system when the command has finished.
Verify if IOMMU is enabled by running after a reboot:
dmesg |grep AMD-Vi
[    0.218841] pci 0000:00:00.2: AMD-Vi: IOMMU performance counters supported
[    0.219687] pci 0000:00:00.2: AMD-Vi: Found IOMMU cap 0x40
[    0.219688] AMD-Vi: Extended features (0x58f77ef22294ade): PPR X2APIC NX GT IA GA PC GA_vAPIC
[    0.219691] AMD-Vi: Interrupt remapping enabled
[    0.219691] AMD-Vi: Virtual APIC enabled
[    0.219692] AMD-Vi: X2APIC enabled
For systemd boot manager as used in Pop!_OS
One can use the kernelstub module, on systemd booting operating systems, in order to provide boot parameters. Use it like so:
sudo kernelstub -o "amd_iommu=on amd_iommu=pt"
Identification of the guest GPU
Attention!
After the finishing the upcoming steps, the guest GPU will be ignored by the host OS.
You have to have a second GPU running on your host OS now!
In this chapter we want to identify and isolate the devices before we pass them over to the virtual machine. We are looking for a GPU and a USB controller in suitable IOMMU groups. This means, either both devices have their own group, or they share one group.
The game plan is to apply the vfio-pci driver to the to be passed-through GPU, before the regular graphic card driver can take control of it.
This is the most crucial step in the process. In case your mainboard does not support proper IOMMU grouping, you can still try patching your kernel with the ACS override patch.
One can use a bash script like this in order to determine devices and their grouping:
#!/bin/bash
# change the 999 if needed
shopt -s nullglob
for d in /sys/kernel/iommu_groups/{0..999}/devices/*; do
    n=${d#*/iommu_groups/*}; n=${n%%/*}
    printf 'IOMMU Group %s ' "$n"
    lspci -nns "${d##*/}"
done;
source: wiki.archlinux.org + added sorting for the first 999 IOMMU groups
IOMMU Group 0 00:01.0 Host bridge [0600]: Advanced Micro Devices, Inc. [AMD] Starship/Matisse PCIe Dummy Host Bridge [1022:1482]
IOMMU Group 1 00:01.1 PCI bridge [0604]: Advanced Micro Devices, Inc. [AMD] Starship/Matisse GPP Bridge [1022:1483]
IOMMU Group 2 00:01.3 PCI bridge [0604]: Advanced Micro Devices, Inc. [AMD] Starship/Matisse GPP Bridge [1022:1483]
IOMMU Group 3 00:02.0 Host bridge [0600]: Advanced Micro Devices, Inc. [AMD] Starship/Matisse PCIe Dummy Host Bridge [1022:1482]
IOMMU Group 4 00:03.0 Host bridge [0600]: Advanced Micro Devices, Inc. [AMD] Starship/Matisse PCIe Dummy Host Bridge [1022:1482]
IOMMU Group 5 00:03.1 PCI bridge [0604]: Advanced Micro Devices, Inc. [AMD] Starship/Matisse GPP Bridge [1022:1483]
IOMMU Group 6 00:03.2 PCI bridge [0604]: Advanced Micro Devices, Inc. [AMD] Starship/Matisse GPP Bridge [1022:1483]
IOMMU Group 7 00:04.0 Host bridge [0600]: Advanced Micro Devices, Inc. [AMD] Starship/Matisse PCIe Dummy Host Bridge [1022:1482]
IOMMU Group 8 00:05.0 Host bridge [0600]: Advanced Micro Devices, Inc. [AMD] Starship/Matisse PCIe Dummy Host Bridge [1022:1482]
IOMMU Group 9 00:07.0 Host bridge [0600]: Advanced Micro Devices, Inc. [AMD] Starship/Matisse PCIe Dummy Host Bridge [1022:1482]
IOMMU Group 10 00:07.1 PCI bridge [0604]: Advanced Micro Devices, Inc. [AMD] Starship/Matisse Internal PCIe GPP Bridge 0 to bus[E:B] [1022:1484]
IOMMU Group 11 00:08.0 Host bridge [0600]: Advanced Micro Devices, Inc. [AMD] Starship/Matisse PCIe Dummy Host Bridge [1022:1482]
IOMMU Group 12 00:08.1 PCI bridge [0604]: Advanced Micro Devices, Inc. [AMD] Starship/Matisse Internal PCIe GPP Bridge 0 to bus[E:B] [1022:1484]
IOMMU Group 13 00:08.2 PCI bridge [0604]: Advanced Micro Devices, Inc. [AMD] Starship/Matisse Internal PCIe GPP Bridge 0 to bus[E:B] [1022:1484]
IOMMU Group 14 00:08.3 PCI bridge [0604]: Advanced Micro Devices, Inc. [AMD] Starship/Matisse Internal PCIe GPP Bridge 0 to bus[E:B] [1022:1484]
IOMMU Group 15 00:14.0 SMBus [0c05]: Advanced Micro Devices, Inc. [AMD] FCH SMBus Controller [1022:790b] (rev 61)
IOMMU Group 15 00:14.3 ISA bridge [0601]: Advanced Micro Devices, Inc. [AMD] FCH LPC Bridge [1022:790e] (rev 51)
IOMMU Group 16 00:18.0 Host bridge [0600]: Advanced Micro Devices, Inc. [AMD] Matisse/Vermeer Data Fabric: Device 18h; Function 0 [1022:1440]
IOMMU Group 16 00:18.1 Host bridge [0600]: Advanced Micro Devices, Inc. [AMD] Matisse/Vermeer Data Fabric: Device 18h; Function 1 [1022:1441]
IOMMU Group 16 00:18.2 Host bridge [0600]: Advanced Micro Devices, Inc. [AMD] Matisse/Vermeer Data Fabric: Device 18h; Function 2 [1022:1442]
IOMMU Group 16 00:18.3 Host bridge [0600]: Advanced Micro Devices, Inc. [AMD] Matisse/Vermeer Data Fabric: Device 18h; Function 3 [1022:1443]
IOMMU Group 16 00:18.4 Host bridge [0600]: Advanced Micro Devices, Inc. [AMD] Matisse/Vermeer Data Fabric: Device 18h; Function 4 [1022:1444]
IOMMU Group 16 00:18.5 Host bridge [0600]: Advanced Micro Devices, Inc. [AMD] Matisse/Vermeer Data Fabric: Device 18h; Function 5 [1022:1445]
IOMMU Group 16 00:18.6 Host bridge [0600]: Advanced Micro Devices, Inc. [AMD] Matisse/Vermeer Data Fabric: Device 18h; Function 6 [1022:1446]
IOMMU Group 16 00:18.7 Host bridge [0600]: Advanced Micro Devices, Inc. [AMD] Matisse/Vermeer Data Fabric: Device 18h; Function 7 [1022:1447]
IOMMU Group 17 01:00.0 Non-Volatile memory controller [0108]: Micron/Crucial Technology P1 NVMe PCIe SSD [c0a9:2263] (rev 03)
IOMMU Group 18 02:00.0 USB controller [0c03]: Advanced Micro Devices, Inc. [AMD] X370 Series Chipset USB 3.1 xHCI Controller [1022:43b9] (rev 02)
IOMMU Group 18 02:00.1 SATA controller [0106]: Advanced Micro Devices, Inc. [AMD] X370 Series Chipset SATA Controller [1022:43b5] (rev 02)
IOMMU Group 18 02:00.2 PCI bridge [0604]: Advanced Micro Devices, Inc. [AMD] X370 Series Chipset PCIe Upstream Port [1022:43b0] (rev 02)
IOMMU Group 18 03:00.0 PCI bridge [0604]: Advanced Micro Devices, Inc. [AMD] 300 Series Chipset PCIe Port [1022:43b4] (rev 02)
IOMMU Group 18 03:02.0 PCI bridge [0604]: Advanced Micro Devices, Inc. [AMD] 300 Series Chipset PCIe Port [1022:43b4] (rev 02)
IOMMU Group 18 03:03.0 PCI bridge [0604]: Advanced Micro Devices, Inc. [AMD] 300 Series Chipset PCIe Port [1022:43b4] (rev 02)
IOMMU Group 18 03:04.0 PCI bridge [0604]: Advanced Micro Devices, Inc. [AMD] 300 Series Chipset PCIe Port [1022:43b4] (rev 02)
IOMMU Group 18 03:06.0 PCI bridge [0604]: Advanced Micro Devices, Inc. [AMD] 300 Series Chipset PCIe Port [1022:43b4] (rev 02)
IOMMU Group 18 03:07.0 PCI bridge [0604]: Advanced Micro Devices, Inc. [AMD] 300 Series Chipset PCIe Port [1022:43b4] (rev 02)
IOMMU Group 18 07:00.0 USB controller [0c03]: ASMedia Technology Inc. ASM1143 USB 3.1 Host Controller [1b21:1343]
IOMMU Group 18 08:00.0 Ethernet controller [0200]: Intel Corporation I211 Gigabit Network Connection [8086:1539] (rev 03)
IOMMU Group 18 09:00.0 PCI bridge [0604]: ASMedia Technology Inc. ASM1083/1085 PCIe to PCI Bridge [1b21:1080] (rev 04)
IOMMU Group 18 0a:04.0 Multimedia audio controller [0401]: C-Media Electronics Inc CMI8788 [Oxygen HD Audio] [13f6:8788]
IOMMU Group 19 0b:00.0 VGA compatible controller [0300]: NVIDIA Corporation GP107 [GeForce GTX 1050 Ti] [10de:1c82] (rev a1)
IOMMU Group 19 0b:00.1 Audio device [0403]: NVIDIA Corporation GP107GL High Definition Audio Controller [10de:0fb9] (rev a1)
IOMMU Group 20 0c:00.0 VGA compatible controller [0300]: NVIDIA Corporation GP104 [GeForce GTX 1060 6GB] [10de:1b83] (rev a1)
IOMMU Group 20 0c:00.1 Audio device [0403]: NVIDIA Corporation GP104 High Definition Audio Controller [10de:10f0] (rev a1)
IOMMU Group 21 0d:00.0 Non-Essential Instrumentation [1300]: Advanced Micro Devices, Inc. [AMD] Starship/Matisse PCIe Dummy Function [1022:148a]
IOMMU Group 22 0e:00.0 Non-Essential Instrumentation [1300]: Advanced Micro Devices, Inc. [AMD] Starship/Matisse Reserved SPP [1022:1485]
IOMMU Group 23 0e:00.1 Encryption controller [1080]: Advanced Micro Devices, Inc. [AMD] Starship/Matisse Cryptographic Coprocessor PSPCPP [1022:1486]
IOMMU Group 24 0e:00.3 USB controller [0c03]: Advanced Micro Devices, Inc. [AMD] Matisse USB 3.0 Host Controller [1022:149c]
IOMMU Group 25 0e:00.4 Audio device [0403]: Advanced Micro Devices, Inc. [AMD] Starship/Matisse HD Audio Controller [1022:1487]
IOMMU Group 26 0f:00.0 SATA controller [0106]: Advanced Micro Devices, Inc. [AMD] FCH SATA Controller [AHCI mode] [1022:7901] (rev 51)
IOMMU Group 27 10:00.0 SATA controller [0106]: Advanced Micro Devices, Inc. [AMD] FCH SATA Controller [AHCI mode] [1022:7901] (rev 51)
The syntax of the resulting output reads like this:

The interesting bits are the PCI bus id (marked dark red in figure1) and the device identification (marked orange in figure1).
These are the devices of interest:
Guest GPU - GTX1060
=================
IOMMU group 17
         0c:00.0 VGA compatible controller [0300]: NVIDIA Corporation GP104 [GeForce GTX 1060 6GB] [10de:1b83] (rev a1)
                Driver: nvidia
         0c:00.1 Audio device [0403]: NVIDIA Corporation GP104 High Definition Audio Controller [10de:10f0] (rev a1)
                Driver: snd_hda_intel

USB host
=======
IOMMU group 20
         0d:00.3 USB controller [0c03]: Advanced Micro Devices, Inc. [AMD] Family 17h (Models 00h-0fh) USB 3.0 Host Controller [1022:145c]
Driver: xhci_hcd 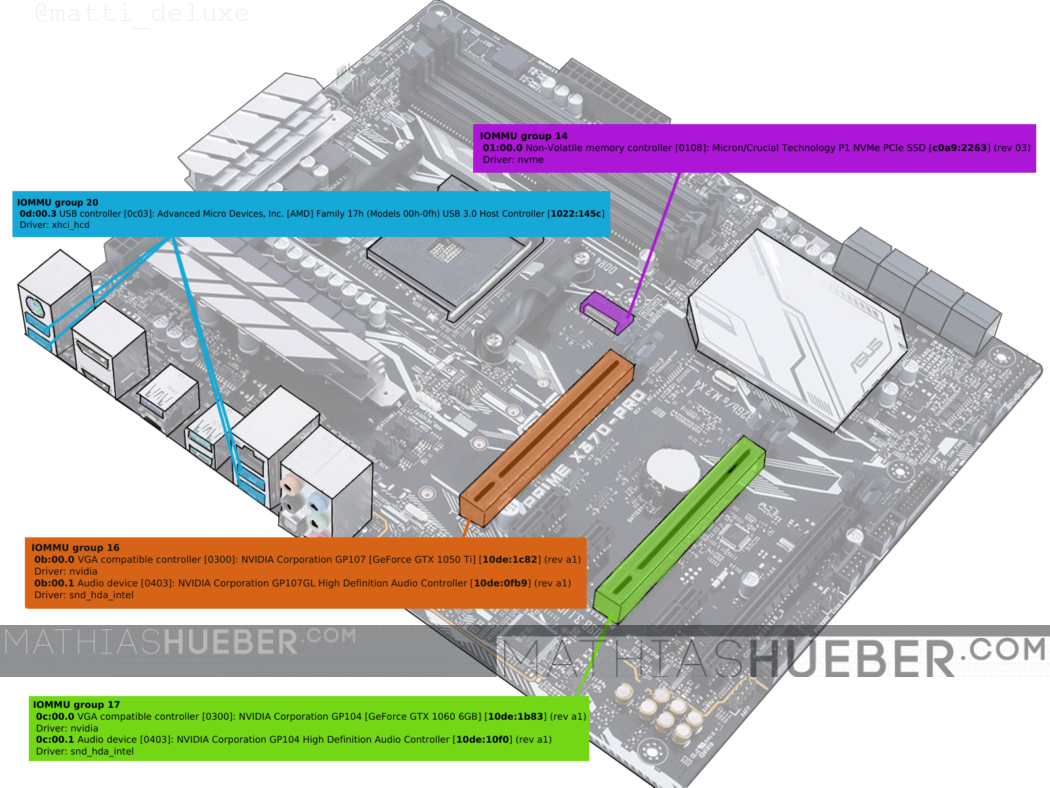
We will isolate the GTX 1060 (PCI-bus 0c:00.0 and 0c:00.1; device id 10de:1b83, 10de:10f0).
The USB-controller (PCI-bus 0d:00.3; device id 1022:145c) is used later on.
The NVME SSD can be passed through without identification numbers. It is crucial though that it has its own group.
Isolation of the guest GPU
In order to isolate the GPU we have two options. Select the devices by PCI bus address or by device ID. Both options have pros and cons.
Apply VFIO-pci driver by device id (via bootmanager)
This option should only be used, in case the graphics cards in the system are not exactly the same model.
Update the grub command again, and add the PCI device ids with the vfio-pci.ids parameter.
Run sudo nano /etc/default/grub and update the GRUB_CMDLINE_LINUX_DEFAULT line again:
GRUB_CMDLINE_LINUX_DEFAULT="amd_iommu=on iommu=pt vfio-pci.ids=10de:1b83,10de:10f0"Save and close the file. Afterwards run:
sudo update-grub
Attention!
After the following reboot the isolated GPU will be ignored by the host OS. You have to use the other GPU for the host OS NOW!
→ Reboot the system.
Accordingly, for a systemd boot manager system like Pop!_OS 19.04 and newer, you can use:
sudo kernelstub --add-options "vfio-pci.ids=10de:1b80,10de:10f0,8086:1533"
Apply VFIO-pci driver by PCI bus id (via script)
This method works even if you want to isolate one of two identical cards. Attention though, in case PCI-hardware is added or removed from the system the PCI bus ids will change (also sometimes after BIOS updates).
Create another file via sudo nano /etc/initramfs-tools/scripts/init-top/vfio.sh and add the following lines:
#!/bin/sh

PREREQ=""

prereqs()
{
   echo "$PREREQ"
}

case $1 in
prereqs)
   prereqs
   exit 0
   ;;
esac

for dev in 0000:0c:00.0 0000:0c:00.1
do
 echo "vfio-pci" > /sys/bus/pci/devices/$dev/driver_override
 echo "$dev" > /sys/bus/pci/drivers/vfio-pci/bind
done

exit 0
Thanks to /u/nazar-pc on reddit. Make sure the line
for dev in 0000:0c:00.0 0000:0c:00.1Has the correct PCI bus ids for the GPU you want to isolate. Now save and close the file.
Make the script executable via:
sudo chmod +x /etc/initramfs-tools/scripts/init-top/vfio.sh
Save and close the file.
When all is done, run:
sudo update-initramfs -u -k all
Attention!
After the following reboot the isolated GPU will be ignored by the host OS. You have to use the other GPU for the host OS NOW!
→ Reboot the system.
Verify the isolation
In order to verify a proper isolation of the device, run:
lspci -nnv
find the line "Kernel driver in use" for the GPU and its audio part. It should state vfio-pci.
0c:00.0 VGA compatible controller [0300]: NVIDIA Corporation GP104 [GeForce GTX 1060 6GB] [10de:1b83] (rev a1) (prog-if 00 [VGA controller])
	Subsystem: ASUSTeK Computer Inc. GP104 [GeForce GTX 1060 6GB] [1043:8655]
	Flags: fast devsel, IRQ 15, IOMMU group 20
	Memory at f3000000 (32-bit, non-prefetchable) [disabled] [size=16M]
	Memory at c0000000 (64-bit, prefetchable) [disabled] [size=256M]
	Memory at d0000000 (64-bit, prefetchable) [disabled] [size=32M]
	I/O ports at d000 [disabled] [size=128]
	Expansion ROM at f4000000 [disabled] [size=512K]
	Capabilities:
	Kernel driver in use: vfio-pci
	Kernel modules: nvidiafb, nouveau, nvidia_drm, nvidia
0c:00.1 Audio device [0403]: NVIDIA Corporation GP104 High Definition Audio Controller [10de:10f0] (rev a1)
	Subsystem: ASUSTeK Computer Inc. GP104 High Definition Audio Controller [1043:8655]
	Flags: fast devsel, IRQ 5, IOMMU group 20
	Memory at f4080000 (32-bit, non-prefetchable) [disabled] [size=16K]
	Capabilities:
	Kernel driver in use: vfio-pci
	Kernel modules: snd_hda_intel
Congratulations, the hardest part is done! 🙂
Is this content any helpful? Then please consider supporting me.
If you appreciate the content I create, this is your chance to give something back and earn some good old karma.
Although ads are fun to play with, and very important for content creators, I felt a strong hypocrisy in putting ads on my website. Even though, I always try to minimize the data collecting part to a minimum.
Thus, please consider supporting this website directly.
Creating the Windows virtual machine
The virtualization is done via an open source machine emulator and virtualizer called QEMU. One can either run QEMU directly, or use a GUI called virt-manager in order setup and run a virtual machine.
I personally prefer the GUI. Unfortunately not every setting is supported in virt-manager. Thus, I define the basic settings in the UI, do a quick VM start install missing drivers and do performance tweaks after the first shut down via virsh edit.
Make sure you have your Windows ISO file, as well as the virtio windows drivers downloaded and ready for the installation.
Pre-configuration steps
As I said, lots of variable parts can add complexity to a passthrough guide. Before we can continue we have to make a decision about the storage type of the virtual machine.
Creating image container if needed.
In this guide I have installed windows 11 in an image container under /home/username/vms/win11.img, see the storage post for further information.
shell fallocate -l 55G /home/user-name/vms/win11.img
Check the previous (20.04 version) of this guide if you like to see how I pass my NVME M.2 SSD to the virtual machine.
Creating an Ethernet Bridge
In Ubuntu 22.04, I had a virtual bridge device allready in list (called virbr0) Otherwise, simply follow Heikos guide, here.
See the ethernet setups post for further information.
Create a new virtual machine
As said before we use the virtual machine manager GUI to create the virtual machine with basic settings.
In order to do so start up the manager and click the “Create a new virtual machine” button.
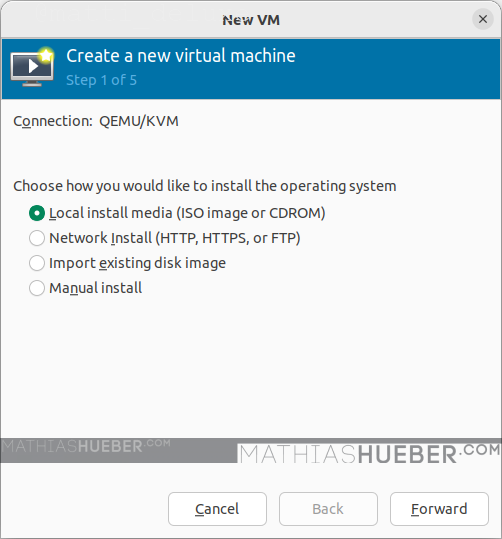
Step 1 of 5
Select “Local install media” and proceed forward (see Figure3).
Step 2 of 5
Now we have to select the windows ISO file we want to use for the installation (see Figure4). I am not sure why, but the automatic system detection stated windows 10. Which was no problem.
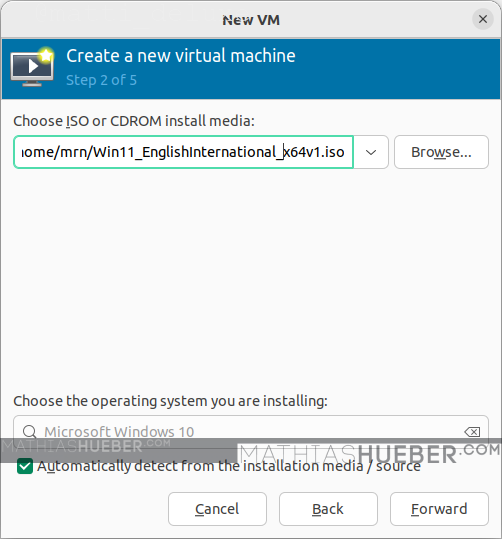
Hint: Use the button “Browse local” (one of the buttons on the right side) to browse to the ISO location.
Step 3 of 5
Put in the amount of RAM and CPU cores you want to passthrough and continue with the wizard.
For my setup, I want to use 8 cores and 16384 MiB of RAM in the virtual machine.

Step 4 of 5
In case you use a storage file, select your previously created storage file and continue. I uncheck the “Enable storage for this virtual machine” check-box and add my device later on.

Step 5 of 5
On the last step are slightly more clicks required.
Give your virtual machine a meaningful name. This becomes the name of the xml config file, I guess I would not use anything with spaces in it. It might work without a problem, but I wasn’t brave enough to do so in the past.
Important!
Make sure to check “Customize configuration before install“
For the “network selection” select our bridge device. You can use ifconfig in a terminal to show your Ethernet devices. In my case that is “virbr0” which, as stated earlier, already existed.

First configuration
Once you have pressed “Finish” the virtual machine configuration window opens. The left column displays all hardware devices of the VM. By left clicking on them, you see the options for the device on the right side. You can remove hardware via right click. You can add more hardware via the button below. Make sure to hit apply after every change.
The following screenshots may vary slightly from your GUI (as I have added and removed some hardware devices).
Overview
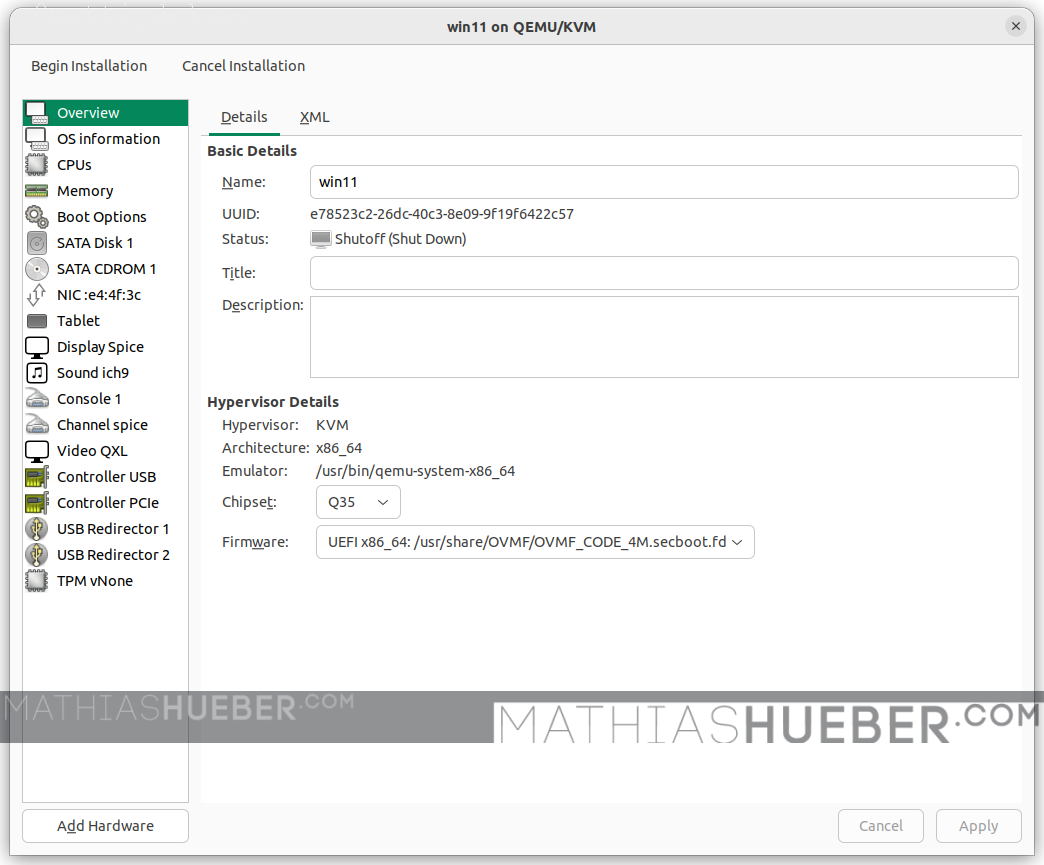
On the Overview page make sure to set:
- Chipset: “Q35”
- Firmware: “OVMF_CODE_4M.secboot.fd”
as shown in Figure9.
CPUs
Enable “Copy host CPU configuration (host-paathrough)“. This will pass all CPU information to the guest. See the CPU Model Information chapter in the performance guide for further information.
I am running and AMD Ryzen 3800XT. For “Topology” I check “Manually set CPU topology” with the following values:
- Sockets: 1
- Cores: 4
- Threads: 2

Boot Options
In the previous 5 step wizard we have created two storage devices.

One is an SATA CDROM (SATA CDROM 1) emulator which will load our Windows 11 image for the installation process.
The second one (SATA DISK 1) is our installation target. Either a raw image file container or a real hardware device.
Make sure to have SATA CDROM 1 in the first spot see Figure11.
Disk 1, the Guests hard drive
In the previous wizard, we have selected an raw image file as our storage container. For best performance change the “Disk bus:” value to VirtIO as shown in Figure12.

Depending on your storage pre-configuration step, you have to choose the adequate storage type for your disk (raw image container or passed-through real hardware) see the storage article for further options.
VirtIO Driver
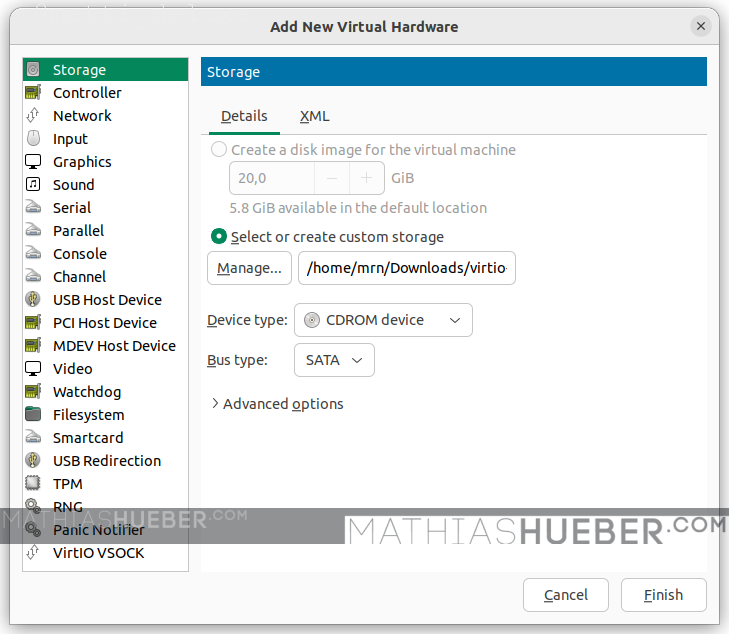
Next we have to add the virtIO driver ISO, so it can be used during the Windows installation. Otherwise, the installer can not recognize the storage volume as we set it to VirtIO.
In order to add the driver press “Add Hardware”, select “Storage” select the downloaded image file.
For “Device type:” select CD-ROM device. For “Bus type:” select SATA otherwise Windows will also not find the CD-ROM either 😛 (see Figure13).
TPM
Windows 11 likes TPM 2.0 devices. I use an emulated TPM device.
In case a real device is needed, you could passthrough this device as well.
My settings are:
- Type: Emulated
- Version: 2.0
The GPU passthrough
Finally! In order to fulfill the GPU passthrough, we have to add our guest GPU and the USB controller to the virtual machine. Click “Add Hardware” select “PCI Host Device” and find the device by its ID. Do this three times:
- 0000:0c:00.0 for GeForce GTX 1060
- 0000:0c:00.1 for GeForce GTX 1060 Audio
- 0000:0e:00.3 for the USB controller
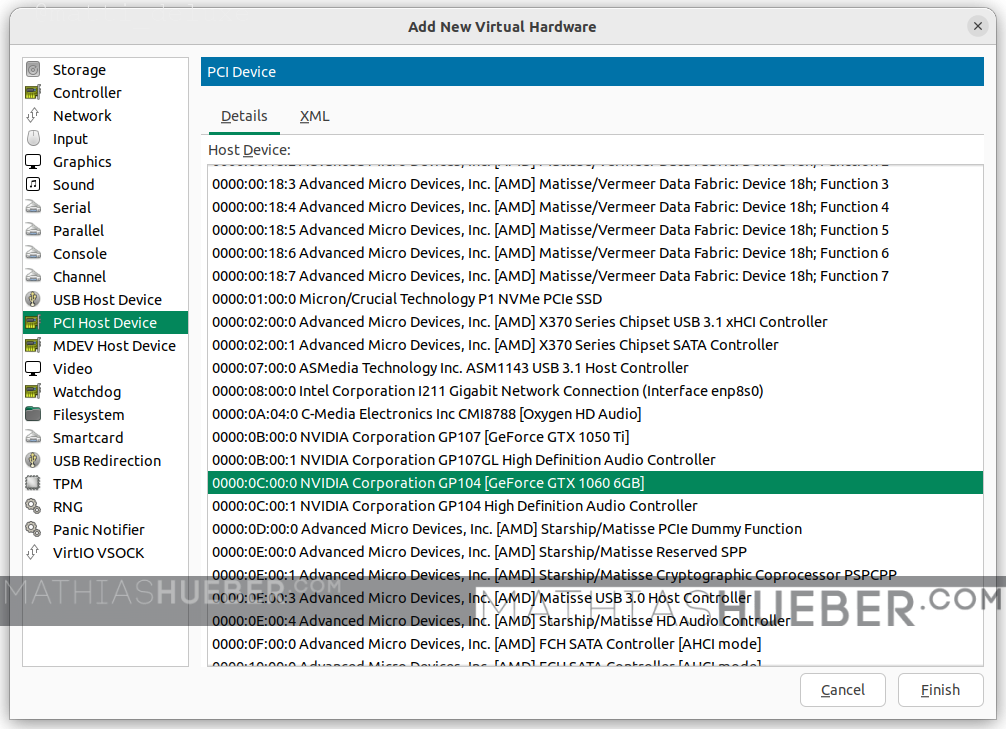
Remark: In case you later add further hardware (e.g. another PCIE device), these IDs might/will change – just keep in mind if you change the hardware just redo this step with updated Ids.
This should be it.
Beginn the Windows 11 installation
Hit “Begin installation”, a “Tiano core” logo should appear in the virt-manager. Optionally you can use the monitor connected to the passed-through GTX 1060 and plug-in a second mouse and keyboard into the USB-ports of the passed-through controller (see Figure2).
If a funny white and yellow shell pops-up you can use exit in order to leave it. When nothing happens, make sure you have both CD-ROM device (one for each ISO, Windows11 and VirtIO drivers) in your list. Also check the “boot options” entry.
Load VirtIO driver during installation
When you reach the installation target list it will be empty, as we set the storage to “VirtIO”. We now have to load the correct driver.
Choose “Load driver” navigate to your VirtIO-CDROM and select “viostor\w10\amd64” press [OK].
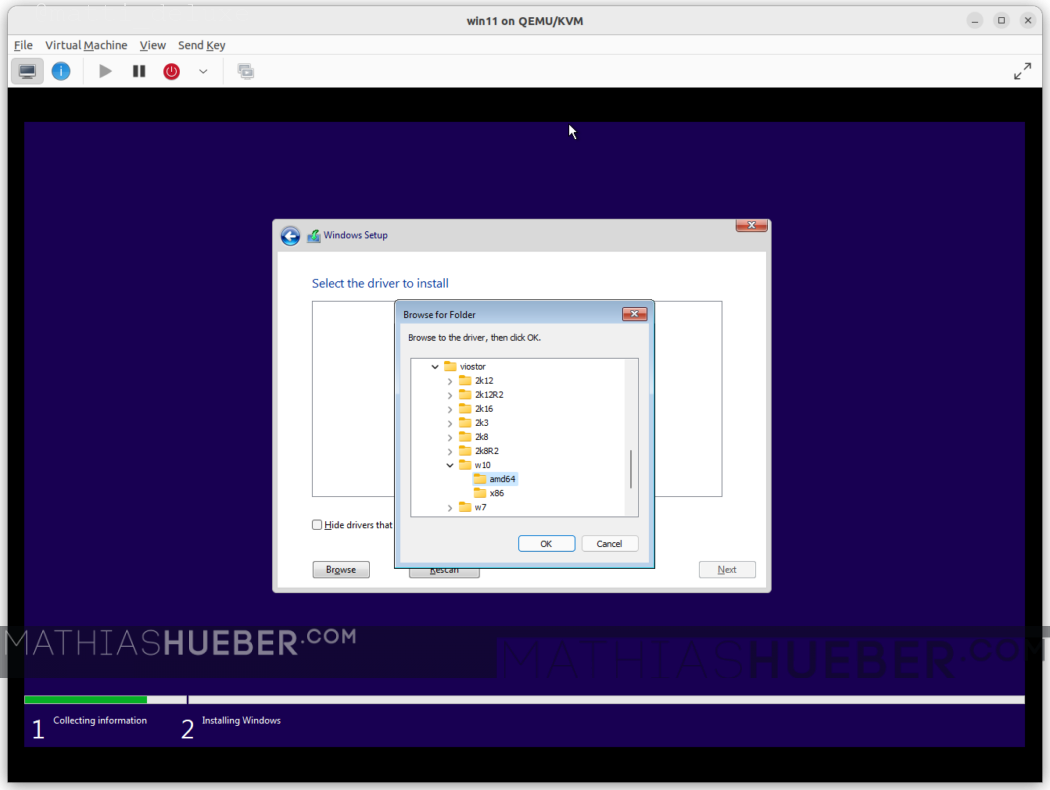
If you do not see any drivers, make sure to unselect “Hide drivers that aren’t compatible with this computer’s hardware.”
Select the first driver (“Red Hat VirtIO SCSI controller …”) and press [Next]
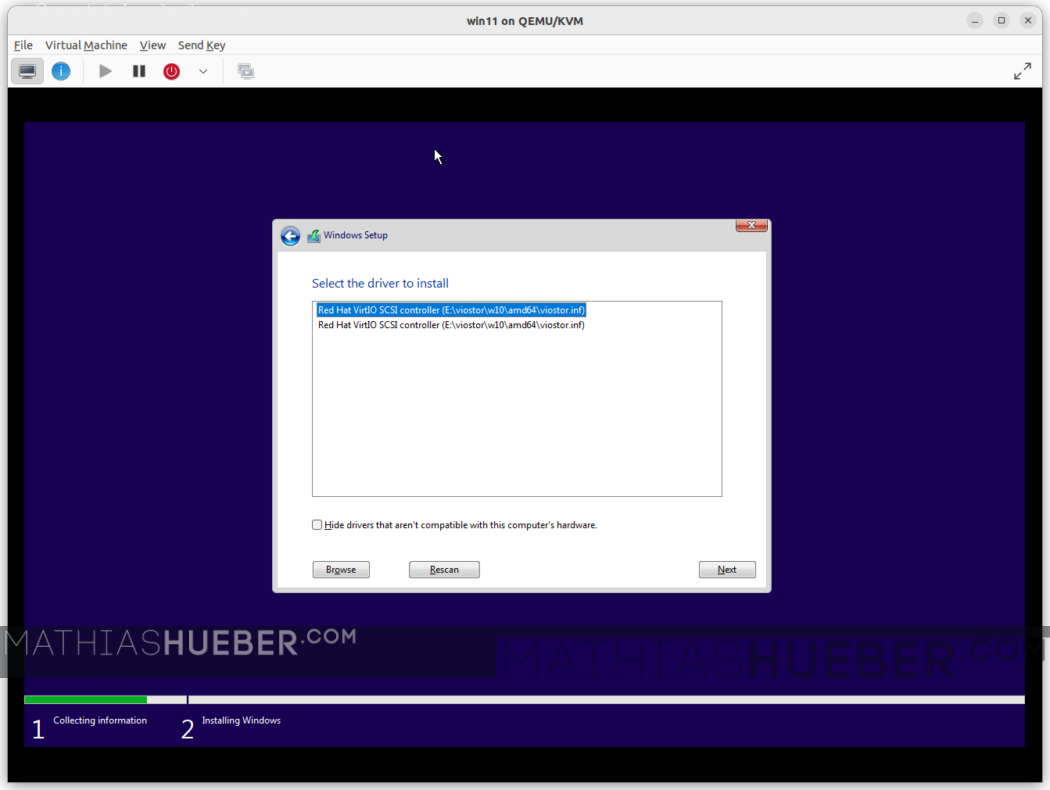
Now you should be able to see your drive in installation target list.
Start the installation and finish the proccess until you are on the Windows 11 desktop. Go to system hardware and make sure all drivers are correctly installed. Install your GPU driver and missing VirtIO drivers if needed.
Now shut down the virtual machine.
Is this content any helpful? Then please consider supporting me.
If you appreciate the content I create, this is your chance to give something back and earn some good old karma.
Although ads are fun to play with, and very important for content creators, I felt a strong hypocrisy in putting ads on my website. Even though, I always try to minimize the data collecting part to a minimum.
Thus, please consider supporting this website directly.
Final configuration and optional steps
I have removed the following devices in virt-manager:
- SATA CDROM 1
- SATA CDROM 2
- Tablet
- Display Spice
- Video QXL
- Channel spice
In order edit the virtual machines configuration use: virsh edit your-windows-vm-name
Once your done editing, you can use CTRL+x CTRL+y to exit the editor and save the changes.
I have added the following changes to my configuration:
AMD Ryzen CPU optimizations
I moved this section in a separate article – see the CPU pinning part of the performance optimization article.
Hugepages for better RAM performance
The Hugepages post has been updated and is ready for you.
Performance tuning
Troubleshooting
Previous OVMF settings
I wanted to use my “old” windows 10 virtual machine, which works well under my 20.04 daily driver. Unfortunately I kept getting “Preparing Automatic repair” boot loops without windows booting up.
Turns out I had to change:
<loader readonly='yes' type='pflash'>/usr/share/OVMF/OVMF_CODE.ms.fd</loader>
into
<loader readonly="yes" type="pflash">/usr/share/OVMF/OVMF_CODE_4M.fd</loader>
Afterwards my virtual machine started but only to stop the boot up at grub>
In order to properly boot again I had to the windows bootloader. I did this via:
grub> ls
grub> chainloader (hd0, gpt2)/EFI/Microsoft/Boot/bootmgfw.efi
grub> boot
The grub>ls command displays all available partitions on the disk. Default for the windows boot is (hd0, gpt2) . You might have to adapt this to your needs.
Problem virtman no permission to access
Remark if you have problems accessing your virtual machines: “virtman no permission to access img”
add your user to /etc/libvirt/qemu.conf -> user = “<your_user_name>”
from: https://github.com/jedi4ever/veewee/issues/996#issuecomment-536519623
Error starting domain: internal error: process exited while connecting to monitor: 2022-05-24T11:59:04.186563Z qemu-system-x86_64: -blockdev {"driver":"file","filename":"/media/user-name/vm-ssd_data/win10q35.img","node-name":"libvirt-1-storage","auto-read-only":true,"discard":"unmap"}: Could not open '/media/user-name/vm-ssd_data/win10q35.img': Permission denied

Traceback (most recent call last):
  File "/usr/share/virt-manager/virtManager/asyncjob.py", line 72, in cb_wrapper
    callback(asyncjob, *args, **kwargs)
  File "/usr/share/virt-manager/virtManager/asyncjob.py", line 108, in tmpcb
    callback(*args, **kwargs)
  File "/usr/share/virt-manager/virtManager/object/libvirtobject.py", line 57, in newfn
    ret = fn(self, *args, **kwargs)
  File "/usr/share/virt-manager/virtManager/object/domain.py", line 1384, in startup
    self._backend.create()
  File "/usr/lib/python3/dist-packages/libvirt.py", line 1353, in create
    raise libvirtError('virDomainCreate() failed')
libvirt.libvirtError: internal error: process exited while connecting to monitor: 2022-05-24T11:59:04.186563Z qemu-system-x86_64: -blockdev {"driver":"file","filename":"/media/user-name/vm-ssd_data/win10q35.img","node-name":"libvirt-1-storage","auto-read-only":true,"discard":"unmap"}: Could not open '/media/user-name/vm-ssd_data/win10q35.img': Permission denied
Graphic cards errors (e.g. Error 43)
With Nvidia driver v.465 (or later) Nvidia officially supports the use of consumer GPUs in virtual environments. Thus, edits recommended in this section is no longer required.
I rewrote this section and moved it into a separate article.
Getting audio to work
Audio was working perfectly out of the box.
After some sleepless nights I wrote a separate article about that – see chapter Pulse Audio with QEMU 4.2 (and above).
Removing stutter on Guest
There are quite a few software- and hardware-version combinations, which might result in weak Guest performance. I have created a separate article on known issues and common errors.
My final virtual machine libvirt XML configuration
<domain xmlns:qemu="http://libvirt.org/schemas/domain/qemu/1.0" type="kvm">
  <name>win11</name>
  <uuid>e78523c2-26dc-40c3-8e09-9f19f6422c57</uuid>
  <metadata>
    <libosinfo:libosinfo xmlns:libosinfo="http://libosinfo.org/xmlns/libvirt/domain/1.0">
      <libosinfo:os id="http://microsoft.com/win/10"/>
    </libosinfo:libosinfo>
  </metadata>
  <memory unit="KiB">16777216</memory>
  <currentMemory unit="KiB">16777216</currentMemory>
  <vcpu placement="static">8</vcpu>
  <iothreads>2</iothreads>
  <cputune>
    <vcpupin vcpu="0" cpuset="8"/>
    <vcpupin vcpu="1" cpuset="9"/>
    <vcpupin vcpu="2" cpuset="10"/>
    <vcpupin vcpu="3" cpuset="11"/>
    <vcpupin vcpu="4" cpuset="12"/>
    <vcpupin vcpu="5" cpuset="13"/>
    <vcpupin vcpu="6" cpuset="14"/>
    <vcpupin vcpu="7" cpuset="15"/>
    <emulatorpin cpuset="0-3"/>
    <iothreadpin iothread="1" cpuset="0-1"/>
    <iothreadpin iothread="2" cpuset="2-3"/>
  </cputune>
  <os>
    <type arch="x86_64" machine="pc-q35-6.2">hvm</type>
    <loader readonly="yes" secure="yes" type="pflash">/usr/share/OVMF/OVMF_CODE_4M.secboot.fd</loader>
    <nvram>/var/lib/libvirt/qemu/nvram/win11_VARS.fd</nvram>
  </os>
  <features>
    <acpi/>
    <apic/>
    <hyperv mode="custom">
      <relaxed state="on"/>
      <vapic state="on"/>
      <spinlocks state="on" retries="8191"/>
    </hyperv>
    <vmport state="off"/>
    <smm state="on"/>
  </features>
  <cpu mode="host-passthrough" check="none" migratable="on">
    <topology sockets="1" dies="1" cores="4" threads="2"/>
    <feature policy="require" name="topoext"/>
  </cpu>
  <clock offset="localtime">
    <timer name="rtc" tickpolicy="catchup"/>
    <timer name="pit" tickpolicy="delay"/>
    <timer name="hpet" present="no"/>
    <timer name="hypervclock" present="yes"/>
  </clock>
  <on_poweroff>destroy</on_poweroff>
  <on_reboot>restart</on_reboot>
  <on_crash>destroy</on_crash>
  <pm>
    <suspend-to-mem enabled="no"/>
    <suspend-to-disk enabled="no"/>
  </pm>
  <devices>
    <emulator>/usr/bin/qemu-system-x86_64</emulator>
    <disk type="file" device="disk">
      <driver name="qemu" type="raw"/>
      <source file="/home/user-name/vms/win11.img"/>
      <target dev="vda" bus="virtio"/>
      <boot order="2"/>
      <address type="pci" domain="0x0000" bus="0x04" slot="0x00" function="0x0"/>
    </disk>
    <disk type="file" device="disk">
      <driver name="qemu" type="raw"/>
      <source file="/home/user-name/vms/win11_d.img"/>
      <target dev="vdb" bus="virtio"/>
      <address type="pci" domain="0x0000" bus="0x09" slot="0x00" function="0x0"/>
    </disk>
    <controller type="usb" index="0" model="qemu-xhci" ports="15">
      <address type="pci" domain="0x0000" bus="0x02" slot="0x00" function="0x0"/>
    </controller>
    <controller type="pci" index="0" model="pcie-root"/>
    <controller type="pci" index="1" model="pcie-root-port">
      <model name="pcie-root-port"/>
      <target chassis="1" port="0x10"/>
      <address type="pci" domain="0x0000" bus="0x00" slot="0x02" function="0x0" multifunction="on"/>
    </controller>
    <controller type="pci" index="2" model="pcie-root-port">
      <model name="pcie-root-port"/>
      <target chassis="2" port="0x11"/>
      <address type="pci" domain="0x0000" bus="0x00" slot="0x02" function="0x1"/>
    </controller>
    <controller type="pci" index="3" model="pcie-root-port">
      <model name="pcie-root-port"/>
      <target chassis="3" port="0x12"/>
      <address type="pci" domain="0x0000" bus="0x00" slot="0x02" function="0x2"/>
    </controller>
    <controller type="pci" index="4" model="pcie-root-port">
      <model name="pcie-root-port"/>
      <target chassis="4" port="0x13"/>
      <address type="pci" domain="0x0000" bus="0x00" slot="0x02" function="0x3"/>
    </controller>
    <controller type="pci" index="5" model="pcie-root-port">
      <model name="pcie-root-port"/>
      <target chassis="5" port="0x14"/>
      <address type="pci" domain="0x0000" bus="0x00" slot="0x02" function="0x4"/>
    </controller>
    <controller type="pci" index="6" model="pcie-root-port">
      <model name="pcie-root-port"/>
      <target chassis="6" port="0x15"/>
      <address type="pci" domain="0x0000" bus="0x00" slot="0x02" function="0x5"/>
    </controller>
    <controller type="pci" index="7" model="pcie-root-port">
      <model name="pcie-root-port"/>
      <target chassis="7" port="0x16"/>
      <address type="pci" domain="0x0000" bus="0x00" slot="0x02" function="0x6"/>
    </controller>
    <controller type="pci" index="8" model="pcie-root-port">
      <model name="pcie-root-port"/>
      <target chassis="8" port="0x17"/>
      <address type="pci" domain="0x0000" bus="0x00" slot="0x02" function="0x7"/>
    </controller>
    <controller type="pci" index="9" model="pcie-root-port">
      <model name="pcie-root-port"/>
      <target chassis="9" port="0x18"/>
      <address type="pci" domain="0x0000" bus="0x00" slot="0x03" function="0x0" multifunction="on"/>
    </controller>
    <controller type="pci" index="10" model="pcie-root-port">
      <model name="pcie-root-port"/>
      <target chassis="10" port="0x19"/>
      <address type="pci" domain="0x0000" bus="0x00" slot="0x03" function="0x1"/>
    </controller>
    <controller type="pci" index="11" model="pcie-root-port">
      <model name="pcie-root-port"/>
      <target chassis="11" port="0x1a"/>
      <address type="pci" domain="0x0000" bus="0x00" slot="0x03" function="0x2"/>
    </controller>
    <controller type="pci" index="12" model="pcie-root-port">
      <model name="pcie-root-port"/>
      <target chassis="12" port="0x1b"/>
      <address type="pci" domain="0x0000" bus="0x00" slot="0x03" function="0x3"/>
    </controller>
    <controller type="pci" index="13" model="pcie-root-port">
      <model name="pcie-root-port"/>
      <target chassis="13" port="0x1c"/>
      <address type="pci" domain="0x0000" bus="0x00" slot="0x03" function="0x4"/>
    </controller>
    <controller type="pci" index="14" model="pcie-root-port">
      <model name="pcie-root-port"/>
      <target chassis="14" port="0x1d"/>
      <address type="pci" domain="0x0000" bus="0x00" slot="0x03" function="0x5"/>
    </controller>
    <controller type="sata" index="0">
      <address type="pci" domain="0x0000" bus="0x00" slot="0x1f" function="0x2"/>
    </controller>
    <controller type="virtio-serial" index="0">
      <address type="pci" domain="0x0000" bus="0x03" slot="0x00" function="0x0"/>
    </controller>
    <interface type="bridge">
      <mac address="52:54:00:e4:4f:3c"/>
      <source bridge="virbr0"/>
      <model type="e1000e"/>
      <address type="pci" domain="0x0000" bus="0x01" slot="0x00" function="0x0"/>
    </interface>
    <serial type="pty">
      <target type="isa-serial" port="0">
        <model name="isa-serial"/>
      </target>
    </serial>
    <console type="pty">
      <target type="serial" port="0"/>
    </console>
    <channel type="spicevmc">
      <target type="virtio" name="com.redhat.spice.0"/>
      <address type="virtio-serial" controller="0" bus="0" port="1"/>
    </channel>
    <input type="mouse" bus="ps2"/>
    <input type="keyboard" bus="ps2"/>
    <tpm model="tpm-crb">
      <backend type="emulator" version="2.0"/>
    </tpm>
    <sound model="ich9">
      <address type="pci" domain="0x0000" bus="0x00" slot="0x1b" function="0x0"/>
    </sound>
    <audio id="1" type="spice"/>
    <hostdev mode="subsystem" type="pci" managed="yes">
      <source>
        <address domain="0x0000" bus="0x0c" slot="0x00" function="0x0"/>
      </source>
      <address type="pci" domain="0x0000" bus="0x06" slot="0x00" function="0x0"/>
    </hostdev>
    <hostdev mode="subsystem" type="pci" managed="yes">
      <source>
        <address domain="0x0000" bus="0x0c" slot="0x00" function="0x1"/>
      </source>
      <address type="pci" domain="0x0000" bus="0x07" slot="0x00" function="0x0"/>
    </hostdev>
    <hostdev mode="subsystem" type="pci" managed="yes">
      <source>
        <address domain="0x0000" bus="0x0e" slot="0x00" function="0x3"/>
      </source>
      <address type="pci" domain="0x0000" bus="0x08" slot="0x00" function="0x0"/>
    </hostdev>
    <redirdev bus="usb" type="spicevmc">
      <address type="usb" bus="0" port="2"/>
    </redirdev>
    <redirdev bus="usb" type="spicevmc">
      <address type="usb" bus="0" port="3"/>
    </redirdev>
    <memballoon model="virtio">
      <address type="pci" domain="0x0000" bus="0x05" slot="0x00" function="0x0"/>
    </memballoon>
  </devices>
</domain>
to be continued…
Sources
heiko-sieger.info: Really comprehensive guide
Great post by user “MichealS” on level1techs.com forum
Wendels draft post on Level1techs.com
Update
- 2022-05-27 …. initial creation of the 22.04 guide
Is this content any helpful? Then please consider supporting me.
If you appreciate the content I create, this is your chance to give something back and earn some good old karma.
Although ads are fun to play with, and very important for content creators, I felt a strong hypocrisy in putting ads on my website. Even though, I always try to minimize the data collecting part to a minimum.
Thus, please consider supporting this website directly.
jhillman
I have followed this guide to the letter, twice now. And still cannot get it to properly pass through (as far as I can tell). The device is seen, however the NVIDIA installer says it cannot find the device. I can manually point to the driver and it doesn’t give an error 43 or anything, but NVIDIA isn’t happy. Quadro P3200 Mobile. Any thoughts?
Mathias Hueber
Ouhh… the thing is another level of complex if you try it on a laptop. This guide targets dektop computers. I am sorry if that is somehow left unclear. I will add the remark to the articles.
When it comes to passthrough on a laptop you have to dig in really deep. It depends on your laptop. How are integrated and dedicated GPU working together [example](https://camo.githubusercontent.com/09c9fcf7b9aedee9c7517bbb4b2c1bd9f00c6ccf90524fe1f425a04724443068/68747470733a2f2f692e696d6775722e636f6d2f4749377638476b2e6a7067)
This gives a good overview: https://gist.github.com/Misairu-G/616f7b2756c488148b7309addc940b28
If you start with this, search on reddit/r/vfio for your laptop modell and hope someone went through that before.
Good luck,
M.
alex
When I finish all the settings,
启动域时出错: internal error: qemu unexpectedly closed the monitor: 2022-06-30T16:50:46.097964Z qemu-system-x86_64: -device vfio-pci,host=0000:01:00.0,id=hostdev0,bus=pci.5,addr=0x0: vfio 0000:01:00.0: group 1 is not viable
Please ensure all devices within the iommu_group are bound to their vfio bus driver.
Traceback (most recent call last):
File “/usr/share/virt-manager/virtManager/asyncjob.py”, line 72, in cb_wrapper
callback(asyncjob, *args, **kwargs)
File “/usr/share/virt-manager/virtManager/asyncjob.py”, line 108, in tmpcb
callback(*args, **kwargs)
File “/usr/share/virt-manager/virtManager/object/libvirtobject.py”, line 57, in newfn
ret = fn(self, *args, **kwargs)
File “/usr/share/virt-manager/virtManager/object/domain.py”, line 1384, in startup
self._backend.create()
File “/usr/lib/python3/dist-packages/libvirt.py”, line 1353, in create
raise libvirtError(‘virDomainCreate() failed’)
libvirt.libvirtError: internal error: qemu unexpectedly closed the monitor: 2022-06-30T16:50:46.097964Z qemu-system-x86_64: -device vfio-pci,host=0000:01:00.0,id=hostdev0,bus=pci.5,addr=0x0: vfio 0000:01:00.0: group 1 is not viable
Please ensure all devices within the iommu_group are bound to their vfio bus driver.
help me plz
Mathias Hueber
Hey alex,
I am sorry, but a comment section is not the ideal place for troubleshooting like that. I would suggest you create a thread on level1techs or /r/vfio on reddit with your problem.
Have you checked that the iommu is correct (completly passed over), as the error message suggests?
best wishes,
M.
Cameron
I couldn’t get this working following the guide due to an issue with the 5.15 kernel. When I tried to install the driver it would cause Windows to BSOD and then go black. Apparently with certain machines (AMD CPU with NVIDIA GPU) you have to forcibly remove the BOOTFB framebuffer.
This worked with my machine running a 5900x and 3090.
Steps to fix:
1/ Create a .sh file : nano /root/fix_gpu_pass.sh
#!/bin/bash
echo 1 > /sys/bus/pci/devices/0000\:0X\:00.0/remove
echo 1 > /sys/bus/pci/rescan
–> //Note Change “0000\:0X\:00.0” for your GPU PCI ID
2/ make it executable : chmod +x /root/fix_gpu_pass.sh
3/ Add this to your crontab so that it run after reboot :
crontab -e
add:
@reboot /root/fix_gpu_pass.sh
Mathias Hueber
Thank you very much! I will add the information to the article.
Do you know which hardware combination results in the error?
Cameron
It seems to be in most cases a combination of AMD CPU and nvidia GPU. Discussion on issue can be found here:
https://forum.proxmox.com/threads/gpu-passthrough-issues-after-upgrade-to-7-2.109051/page-4
Noel
Thank you for your update post.
I installed a Windows 11 gpu passthrough vm folowing your previous 20.04 post.
After upgrade from ubuntu 20.04 to 22.04 my system did not boot anymore on my installed 5.8 acso kernel.
I solved the iommu groups by installing the last Liquorix kernel (5.19.0-6.1-liquorix-amd64) from this site https://www.linuxcapable.com/how-to-install-liquorix-kernel-on-ubuntu-22-04-lts/
My Windows 11 vm with GPU passthrough is again working as before.
The Liquorix kernel has the acs patch included.
Misha
Passthrough by PCI bus ID didn’t work, seemingly because the script ran too late: nvidia driver was already bound. This worked though:
echo “$dev” > /sys/bus/pci/drivers/nvidia/unbind
echo “vfio-pci” > /sys/bus/pci/devices/$dev/driver_override
echo “$dev” > /sys/bus/pci/drivers/vfio-pci/bind
Tom King
Thanks Misha! That really helped me after some hours of trying to figure it out.
Ubuntu 22.04, kernel 6.5.0-41-generic, 4x2080Ti, win11 guest.
Melvin
I think this tutorial needs to be updated. The PCI bus ID script does not appear to work due to the Nvidia driver being loaded first. I have tried this on Kubuntu 20.04 – 22.04 and Pop_OS 22.04. I am not sure if its possible to remove the nvidia driver from the initramfs or to some how get vfio in before it loads, but I can confirm that the script does not work (it runs to late and only grabs the audio portion).
I tried the solution posted by Misha above and it did not work either unfortunately, but did point in a workable direction.
I used a process loosely based on XKCD 763, the vfio script was modified to only grab the sound component. The following script was placed in /sbin/gpu_isolate:
#!/bin/sh
rmmod nvidia_drm
rmmod nvidia_modeset
rmmod nvidia_uvm
rmmod nvidia
echo “vfio-pci” > /sys/bus/pci/devices/0000:49:00.0/driver_override
echo 0000:49:00.0 > /sys/bus/pci/drivers/vfio-pci/bind
A systemd oneshot service was then used to call this script BEFORE Xorg/gdm were initialized:
[Unit]
Description=Calls the script to isolate the secondary gpu by unloading nvidia a>
Before=graphical.target
StartLimitIntervalSec=0
[Service]
Type=oneshot
ExecStart=gpu_isolate
RemainAfterExit=yes
[Install]
WantedBy=multi-user.target
This service was placed in /etc/systemd/system/gpu-isolate.service
All of this to get the second of to Nvidia 3090s to pass through on an AMD Threadripper machine.
Any suggestions on how to simplify this rube goldberg machine would be great!
Mathias Hueber
Thank you very much for pointing this out. It seems I have to look into it again.
Rodrigue
Hi, really good guide for pci passthrough, all is good with my graphic card, but the audio lack.
The spice server work but pulse audio don’t do job.
I tried your 4.2 qemu guide but i can’t save the xml, i get this error :
XML document failed to validate against schema: Unable to validate doc against /usr/share/libvirt/schemas/domain.rng
Element domain has extra content: qemu:commandline
This line can’t be saved :
I get back the
Help me plz
Reply
Mathias Hueber
Make sure to update the very first line of the config file. It should read:
domain type='kvm' xmlns:qemu='http://libvirt.org/schemas/domain/qemu/1.0'within the pointy brackets.Rodrigue
hi i do with this line but it says that my configuration is edited and when i open the file again the line still domain type=’kvm’ without the xmlns part
Help me plz
Rodrigue
error: XML document failed to validate against schema: Unable to validate doc against /usr/share/libvirt/schemas/domain.rng
Extra element devices in interleave
Element domain failed to validate content
Failed. Try again? [y,n,i,f,?]:
Rodrigue
solved sorry for the disturb, i put the qemu command line after devices and it work maybe i hav a bad read at this.
Thank you at all for your work, and sorry for those replies.
Christopher Hall
I spent roughly 8 hours figuring out gpu passthrough on fedora ubuntu and arch recently.
here’s what actually works as of 10-26-2022
Very hard won knowledge:
lspci -nnk lies. Even if it says vfio-pci is loaded, if other things touched it, it wont work.
add_drivers +=
-loads them too late most of the time, other things get touchy-feely with the card.
-Sometimes it works. This is why it seemed like a race condition.
-crappy version of
force_drivers+=” ”
See add_drivers above. But in this case it is ensured that
the drivers are tried to be loaded early via modprobe.
Grub cmdline
-loads them too late every time
-does not work
-what 99% of guides tell you to do
-amd_iommu=on doesnt do anything now, the kernel looks at the bios to tell if it’s on. intel_iommu=on still needed.
-iommu=pt was never necessary in the first place, it just stops iommu groupings for things that can’t be passed through
-vpio-pci.ids= is still useful for reminding the loading kernel not to try to grab the card vfio owns
The bottom line is, the module load has to go early in the ramdisk or it will not work. In order to force the vfio-pci module to load before anything else in debian/ubuntu land you have to make all the other video drivers depend on it. Otherwise it loads too late.
Arch’s hook for modconf is in the right place so it’s as simple as adding ‘vfio_pci vfio vfio_iommu_type1 vfio_virqfd’ to the modules list in mkinitcpio.conf, and rebooting.
dracut is rhel base
modules.d is ubuntu base
/etc/default/grub
vfio-pci.ids=xxxx:xxxx,xxxx:xxxx
/etc/dracut.conf.d/vfio-pci.conf
force_drivers+=” vfio-pci ”
/etc/modules-load.d/vfio-pci.conf
vfio-pci
/etc/modprobe.d/vfio.conf
options vfio-pci ids=xxxx:xxxx,xxxx:xxxx
softdep radeon pre: vfio-pci
softdep amdgpu pre: vfio-pci
softdep nouveau pre: vfio-pci
softdep nvidia pre: vfio-pci
softdep efifb pre: vfio-pci
softdep drm pre: vfio-pci
Christopher Hall
I forgot to add these in the response but after you change the ramdisk config you need to regenerate it with
dracut –regenerate-all -force
or
update-initramfs -u – k all
or
mkinitcpio -P
There are also several typos but they are easy to spot.
Jeremy
I am contemplating setting up a system using VM’s for streaming, with the stream managed in the linux host but elements of the stream (games, animated graphics) being generated by Windows in the VMs. This would potentially give much greater stability and crash immunity to the stream, but depends on the Guest GPU generated graphics being able to be transferred effectively back to the Host GPU for compositing and final encode.
My guess at the answer is that this is possible: after all, Windows can use a main GPU to render graphics to a screen that is connected to the iGPU; but I’ve not used Windows for 11 years at this point so I’m a bit hazy on it and would appreciate confirmation (also, is the frame rate still acceptable in this case?).
I would also like to confirm (it’s not quite clear from how things are worded in the article) that the isolated GPU can not be passed between the host and the VM as the VM loads, that it is inaccessible to the host from boot and only a reboot to an alternately set up linux install could make it accessible?
Vinnie Esposito
Hi Mathias, really enjoy this guide and is my go to quick command copypasta for getting a new Ubuntu machine up and going. Today ran into a real nightmare with a bridge setup on TrueNAS. Usually I’m a pure passthrough kinda cat who is meticulous about my lanes, but today I had to use a bridge. You might want to update your guide to include this link for your virbr0 instead of the link you posted. I found it much more informative and accurate to 22.04 LTS. https://www.wpdiaries.com/kvm-on-ubuntu/
Thank you again for putting this together.
Bingo
Hi Mathias,I have a question, I don’t have two nvidia gpu, but I have an RTX 4080 and an intel UHD730 (I5 13400), can I follow this tutorial to complete the gpu passthough? What needs to be changed.
Mathias Hueber
I assume you would pass the 4080, in this case there is no real differnece
Misha
Bonus question: suppose I got several monitors connected to the GPU that I pass through. How do I get the mouse to move between them?
Mathias Hueber
I have a monitor with several inputs. I change between them.
I have a Hardware kvm switch for mouse and keyboard
Ernesto
You can also use a software like synergy, is very fast and allows you to work seamlessly on both OSs
Bingo
I see that someone use “Looking Glass” to enhance their KVM experience.
It seems to be able to switch keyboard and mouse between host and guest?
Do you know “Looking Glass”?
If you know, can you make a related tutorial like this amazing tutorial?
Jeroen Beerstra
Thx for your handson and extensive tutorial. I further confinced me that something ‘funky’ was going on with my setup. In my case it turned out that ResizeBar support on my Asus motherboard was to blame for not being able to passthrough my nVidia GPU. No matter what I tried: no image at all :/ No I’m happyly running Windows 11 pro besides AlmaLinux 9.2. Will look into your performance optiomalisation guides next. Hopes this helps somebody else.
Mafia JACK
After the VM is turned on, the card is passed through to the VM, but if the VM is turned off, can the passed-through card return to the host? Is there any way?
Ernesto
Hi There excellent guide
a quick question Is this a Typo?
In the pop os section adding the pci ids you a have a third one, that is not mentioned anywhere.
8086:1533
Marc
Thanks man! You saved my day! I struggled since month to get my CAD software to run on Linux with Wine, very poor performance and many hidden bugs. Now with QEMU and the passthrough for my reactivated Intel HD GPU it feels like it is native runnig on Linux.
Big big Thanks!
Eren Deniz
Sehr geehrter Herr Mathias Hüber,
ich möchte mich ganz herzlich bei Ihnen bedanken.
Dieser Guide hat mir bei meinem VM Dilemma, wo ich wirklich keinen Ausweg mehr fand, aus der Zwickmühle geholfen.
Danke nochmals!
Mit freundlichen Grüßen
Eren Deniz
ikletti
I had your guide in my bookmarks for quite a while, now’s the time that I finally got around to setting up my new PC using Kubuntu 24.04. Main GPU is a GTX 1650, the GPU from the old PC (Radeon RX550) will be dedicated to the VMs.
All is well, until I’m adding the vfio-pci.ids kernel parameter. On verification of the isolation, the HDMI Audio device of the RX550 states “Kernel driver in use: vfio-pci” like it should, so it is kind of working.
But the VGA controller still uses the amdgpu driver. What’s more: The VGA controller has a new PCI ID, which leaves me puzzled. Googling has not yet turned up usable results.
Any ideas what to try?